

The Professional Guide to Artificial Grass Sub-Base Preparation (2026)
The most stunning synthetic lawn isn’t actually defined by the vibrant green blades you see on the surface, but by the engineered layers hidden beneath them. It’s a common mistake to assume the turf handles all the heavy lifting. In reality, your investment’s beauty and longevity depend entirely on meticulous artificial grass sub-base preparation. You likely envision a sanctuary that remains perfectly level for over 15 years, rather than a backyard that develops unsightly dips or traps moisture after a heavy storm.
We understand the frustration of navigating conflicting advice about gravel types and drainage rocks. It’s natural to worry about a premium lawn sinking or becoming a source of mold and odors. This guide masters those technical complexities for you. You’ll gain the confidence to select the right aggregates and execute a professional-grade foundation that supports high-performance products like EverTurf Putting Green Pro. We will walk through the essential steps of excavation, grading, and stabilization to ensure your outdoor space becomes a tranquil, stress-free environment. From choosing the perfect infill to the final security of EverTurf Staples and Glue, you’re about to transform your property into a lasting masterpiece.
Key Takeaways
- Understand why a multi-layered aggregate system is the secret to a lawn that stays level and drains perfectly for decades.
- Identify the best materials for stability, such as Class II Road Base or Decomposed Granite, while learning why rounded pea gravel can compromise your project.
- Master the “4-Inch Rule” for excavation to ensure your artificial grass sub-base preparation provides the structural integrity required for high-traffic areas.
- Learn the professional technique of dampening and compacting your base to create a smooth, professional-looking surface that resists sinking.
- Discover how to integrate your foundation with EverTurf Infill and secure your investment using professional-grade staples and glue.
Why the Sub-Base is the Foundation of Your Synthetic Lawn’s Success
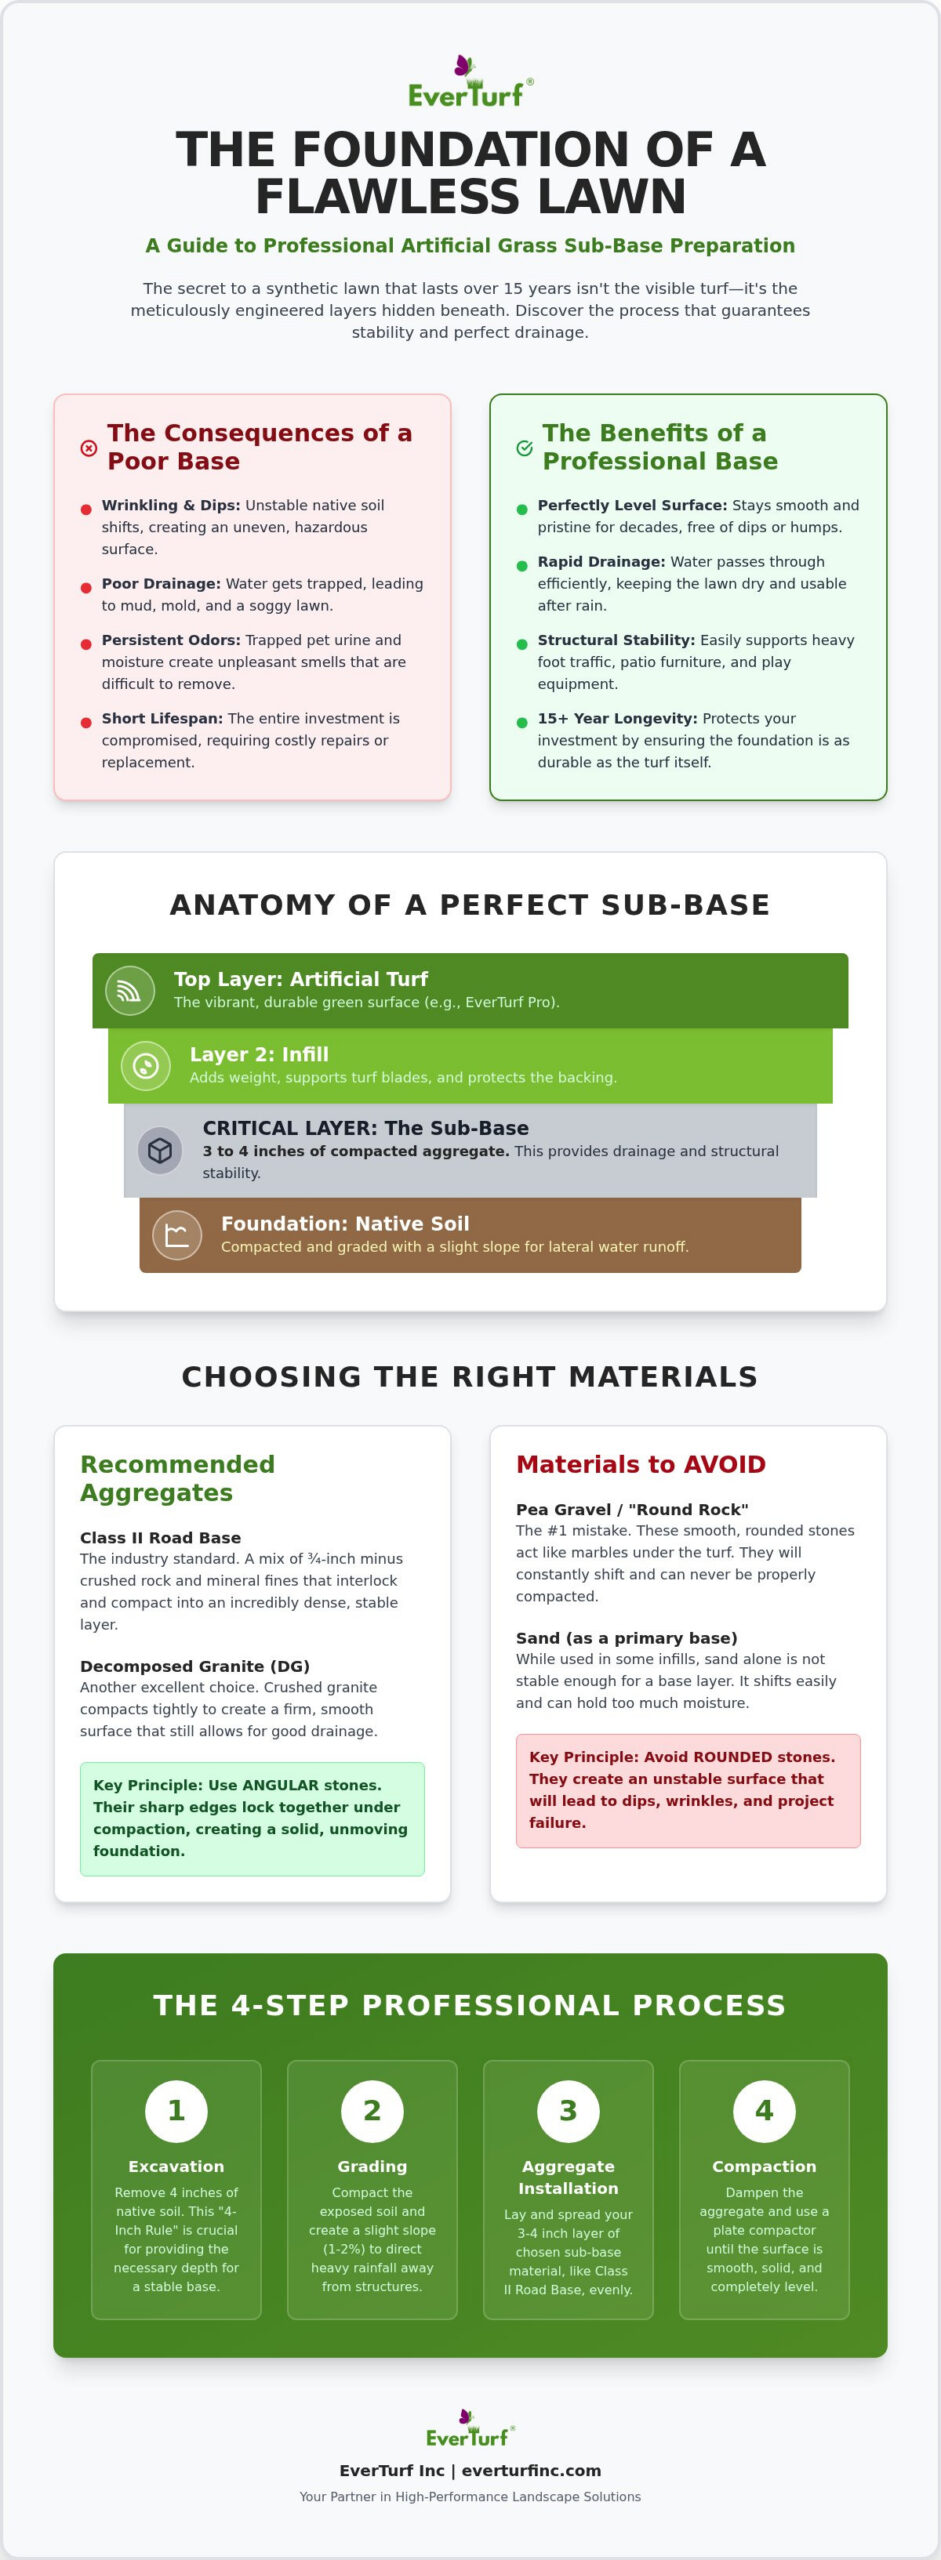
Imagine your lawn as a high-performance vehicle. The turf is the sleek bodywork, but the sub-base is the chassis that holds everything together. A professional artificial grass sub-base preparation involves creating a multi-layered system of compacted aggregates specifically engineered to replace unstable native soil. While an Artificial turf overview reveals the material’s incredible versatility, it’s the foundation that dictates how long that beauty lasts. This system serves three critical roles. It provides structural load-bearing capacity for patio furniture and heavy foot traffic, facilitates rapid vertical drainage, and maintains a perfectly smooth surface for decades.
Relying on native soil is a recipe for long-term frustration. Dirt is inherently unstable; it expands when wet and contracts as it dries, leading to a shifting surface that eventually ruins your artificial grass. When you replace organic soil with stable, non-expansive minerals, you create a permanent solution that ignores the seasonal shifts of the earth. This meticulous artificial grass sub-base preparation ensures your lawn looks as crisp in year fifteen as it did on day one by eliminating the mud and movement associated with traditional dirt yards.
The Consequences of Poor Base Preparation
Skipping steps during the base phase leads to visible failures that are incredibly difficult to fix once the turf is pinned down. You’ll often see “wrinkling” across the surface, which occurs when the sub-base shifts or settles unevenly beneath the blades. These inconsistencies create dips and valleys that turn into tripping hazards for children and unsightly water traps for rain. Beyond aesthetics, a failing base compromises the hygiene of your property. Without proper airflow and drainage, pet urine can become trapped in the aggregate; this leads to persistent odors that disrupt your outdoor tranquility and require expensive remediation later.
Understanding Vertical vs. Lateral Drainage
Effective drainage requires a dual-action approach to keep your lawn pristine. Vertical drainage allows water to pass directly through the turf backing and into the porous sub-base, eventually reaching the earth below. This keeps the surface dry and usable immediately after a storm. However, during heavy rainfall, grading for lateral runoff remains essential. A slight, professional slope directs excess water away from your home’s foundation and toward existing drains. To fully protect your property, specialized solutions like seamless gutter installation Enterprise AL ensure that heavy roof runoff is also diverted properly, preventing it from overwhelming your yard’s drainage system. This combination of permeability and clever grading ensures your lawn remains a clean, dry, and inviting space regardless of the local climate’s unpredictability.
Choosing the Right Sub-Base Materials for Stability
Selecting the correct aggregate is the most influential decision you’ll make during your artificial grass sub-base preparation. Many homeowners mistakenly believe any gravel will suffice. In reality, you need angular materials that interlock under pressure. Avoid “round rock” or pea gravel at all costs. These smooth stones act like tiny marbles; they shift constantly and never achieve the compaction required for a stable surface. Instead, focus on materials that combine various stone sizes with “fines”—the dust-like particles that fill every microscopic void to create a foundation as solid as a paved road.
The balance between stability and drainage is a delicate engineering act. While you want a firm surface, the base must remain porous. Research into the environmental impacts of synthetic turf highlights how critical it is to manage stormwater runoff through proper sub-base permeability. By choosing the right blend of crushed stone, you ensure that heavy rain filters through the system rather than pooling on your lawn or flooding your home’s perimeter. If you’re unsure which local aggregate fits these specs, you can browse our professional-grade accessories to see what the experts use.
Class II Road Base: The Industry Standard
For those seeking a truly elite finish, Decomposed Granite (DG) is the preferred material for the final one-inch “top” layer. DG compacts into an ultra-smooth, concrete-like surface that eliminates any telegraphing of rocks through the turf. This level of precision is mandatory when installing an EverTurf Putting Green, where even a three-millimeter pebble could alter the break of a putt. If DG is difficult to source in your region, “crusher run” or “stone dust” serves as a sophisticated, cost-effective alternative that still delivers a professional-grade, level finish.
Step-by-Step Excavation and Ground Preparation
Safety and precision are the twin pillars of a successful project. Before you break ground for your artificial grass sub-base preparation, you must clearly mark your perimeter and verify the location of underground utility lines. Dialing 811 is a non-negotiable step to protect vital infrastructure; for instance, standard gas lines typically rest at depths of 18 to 24 inches. Once you’ve cleared the safety hurdles, the real work begins with the “4-Inch Rule.” Removing four inches of soil provides the necessary volume for a stable aggregate foundation while ensuring the final turf surface sits flush with your surrounding pavers or edging. This depth is the industry sweet spot for balancing structural integrity with efficient material use.
Don’t leave a single sprig of natural grass behind. Every piece of organic material must be removed because it will eventually decompose, creating air pockets that cause the surface to sink and dip. After the excavation is complete, you must address the “sub-grade,” which is the raw earth left behind. This is where many DIY projects fail. You must compact the native soil using a vibratory plate compactor before adding a single stone. If the earth beneath your base is loose or unstable, your entire installation will eventually shift, regardless of how much rock you pile on top.
Excavation Best Practices
Renting a power sod cutter is the most efficient way to achieve a clean, consistent depth across the entire installation area. If you encounter “soft spots” or heavy clay soil during the dig, you’ll need to pay extra attention to these zones. Clay holds moisture and expands, so digging slightly deeper in these areas and backfilling with extra aggregate provides the necessary stabilization. Your goal is a uniform, firm floor that mirrors the final shape of your lawn, providing a predictable canvas for the layers to come.
Weed Barriers and Geotextiles
High-performance installations rely on commercial-grade geotextiles rather than the thin landscape fabric found at big-box stores. We recommend placing this barrier directly over the compacted sub-grade, beneath your rock layers. This placement serves a dual purpose. It suppresses persistent weeds from reaching the surface and, more importantly, it prevents your clean aggregate from “migrating” or sinking into the native soil. This separation is vital for maintaining the long-term structural integrity and drainage capacity of your artificial grass sub-base preparation, ensuring your investment remains level and pristine for decades.
Achieving Maximum Compaction and a Level Surface
Transforming a pile of loose rock into a solid, unyielding foundation is where your artificial grass sub-base preparation truly comes to life. You must start by lightly dampening the aggregate material with a garden hose. This isn’t just to keep the dust down; it’s a critical engineering step. Moisture acts as a lubricant between the angular stones, allowing them to slide into the tightest possible configuration under pressure. If the material is too dry, the stones will bridge against each other, leaving microscopic air pockets that eventually lead to sinking. Conversely, if the base is over-saturated, it will lose its structural integrity and become spongy.
Aim for a minimum of 90% compaction across the entire site. You’ll know you’ve achieved this when a heavy footstep leaves no visible impression and a screwdriver can’t be easily pushed into the surface. While hand tamping works for tight corners or around delicate irrigation heads, a vibratory plate compactor is essential for the main area. This tool provides the high-frequency force needed to lock the fines into the larger crushed rock, creating a surface that feels more like concrete than gravel. If you want to ensure your foundation is prepared to the highest standards, you can source professional installation tools and accessories here to guarantee a flawless result.
The Compaction Process
Success lies in working in lifts. Don’t attempt to compact the entire four-inch depth in one go; the vibration won’t reach the bottom layer effectively. Instead, spread and compact your material in two-inch increments. This ensures the entire vertical profile is dense and stable. As you run the plate compactor, overlap each pass by at least three inches to eliminate ridges or seams in the base. If you notice an area bouncing or feeling spongy under the machine, you’ve encountered pumping. This usually means the sub-grade is too wet. You must stop, remove the wet material, and allow it to dry before proceeding.
Grading for Drainage and Aesthetics
A perfectly level lawn actually requires a slight, intentional slope. We recommend setting a crown or a 1% to 2% grade that leads water away from your home or other permanent structures. Use string lines and a line level to verify this slope across the entire yard. For properties requiring extra protection against severe water accumulation, you can check out FloodWater Pros to learn about specialized flood barrier systems. Once the grade is set, use a screed bar or a straight edge to shave off high spots and fill in low points. This final grooming phase removes small stray pebbles and irregularities that would otherwise show through the turf backing. This meticulous attention to detail is what separates a DIY project from a professional landscape that remains pristine for decades.
Integrating Your Base with EverTurf High-Performance Systems
The final phase of your artificial grass sub-base preparation is where the structural engineering meets the aesthetic finish. A common oversight is neglecting the cleanliness of the base before laying the turf. You must ensure the surface is free of loose dust or stray pebbles that could create lumps under the backing. This clean slate allows the turf to lay flat and provides the perfect surface for turf infill to do its job. The infill acts as a ballast, pressing the turf down into the base to prevent expansion and contraction while protecting the backing from UV rays and heavy impact.
For homeowners seeking artificial grass for dogs, this integration is non-negotiable. A pro-level base ensures that liquid waste moves quickly through the system, preventing the buildup of bacteria and odors. When the base and infill work in tandem, you create a hygienic sanctuary that remains fresh and inviting for the entire family. By following these rigorous standards, you move away from the frustrations of traditional mud and maintenance toward a tranquil, year-round outdoor space.
Locking it Down with EverTurf Accessories
A solid foundation is only as good as the hardware that secures it. We recommend using EverTurf Staples spaced every six inches along the perimeter to prevent edge lifting or tripping hazards. Because you’ve achieved a firm, compacted surface, these staples will bite into the aggregate and hold fast against wind and traffic. For seams, a well-prepared base provides the flat, stable platform necessary for EverTurf Glue to bond effectively. This ensures your lawn looks like a single, continuous carpet of emerald perfection rather than a series of disconnected panels.
Long-Term Maintenance of Your Base
Ready to build? Explore EverTurf’s professional-grade turf and accessories today.
Build Your Legacy on a Flawless Foundation
Mastering artificial grass sub-base preparation is the definitive step toward reclaiming your personal time and enjoying a pristine outdoor sanctuary. By choosing the right angular aggregates and adhering to the 4-inch excavation rule, you’ve moved past the common pitfalls of sinking and poor drainage. You now understand that precision compaction and thoughtful grading are what allow premium systems like EverTurf Putting Green Pro to perform at an elite level for decades. This technical rigor ensures your investment remains level, hygienic, and beautiful through every season.
We provide a national supply of specialized infill and staples to lock in your hard work. Our expert-vetted installation guides empower you to transform your property with the poise of an industry leader. It’s time to transition from a high-maintenance yard to the tranquility of a worry-free environment. View EverTurf’s Professional Installation Accessories today and take the final step toward your perfect landscape. You’re closer than ever to the lasting satisfaction of a lush, everlasting green space.
Frequently Asked Questions
Can I use sand as a sub-base for artificial grass?
Sand is not a suitable primary sub-base because it lacks the structural integrity to remain level over time. While it might seem convenient, sand shifts underfoot and can wash away during heavy rain, eventually causing your turf to wrinkle or dip. For a professional-grade result, you must use an interlocking aggregate like Class II Road Base. This provides the firm, well-drained foundation necessary for your synthetic lawn to look and feel like a high-end landscape.
How deep should I dig for artificial turf installation?
You should typically excavate to a depth of 4 inches for most residential projects. This “4-Inch Rule” provides enough space for a robust layer of crushed stone and a finishing layer of fines, ensuring your lawn remains stable under heavy foot traffic. Digging to this consistent depth also allows the final turf surface to sit flush with existing walkways or edging, creating the seamless, sophisticated look that characterizes a premium EverTurf installation.
Do I really need a plate compactor, or can I use a hand tamper?
Should the weed barrier go under the gravel or directly under the turf?
We recommend placing a commercial-grade geotextile weed barrier directly over the excavated sub-grade, beneath your gravel base. This placement prevents the clean rock from sinking into the native soil, a process known as migration. By separating the layers at the bottom, you maintain the drainage capacity of the system and stop persistent weeds from finding a path to the surface. This strategy protects your investment and ensures a long-term, low-maintenance outdoor space.
What is the best base material for a backyard putting green?
Decomposed Granite (DG) is the gold standard for backyard putting greens due to its ability to compact into an ultra-smooth finish. Achieving this level of precision is vital for the performance of high-end products like EverTurf Putting Green Pro. The fine particles in DG fill every void, creating a surface that allows for a true ball roll. This meticulous base work transforms your yard into a professional-caliber practice area that looks and plays beautifully.
How do I ensure my artificial grass drains properly after a heavy rain?
Proper drainage is achieved through a combination of a porous aggregate base and a slight 1% to 2% grade away from buildings. The crushed stone layers allow water to pass vertically into the earth, while the subtle slope manages heavy runoff during intense storms. Integrating your base with EverTurf Infill also helps facilitate rapid drainage, ensuring your lawn remains dry, hygienic, and ready for use almost immediately after the clouds clear.
Can I install artificial grass directly over existing dirt?
No, installing synthetic turf directly over dirt is a recipe for failure. Native soil is unstable; it expands and contracts with moisture changes, leading to an uneven surface and poor drainage. Proper artificial grass sub-base preparation involves removing all organic matter and replacing it with engineered aggregates. This professional approach eliminates mud and prevents the “valleys” that occur when dirt settles, ensuring your lawn stays level and vibrant regardless of the weather.
How much does sub-base material typically cost per square foot?
While costs vary based on your specific location and the volume of material required, homeowners generally encounter different price points for each layer of the foundation. Crushed aggregate bases and decomposed granite typically represent the primary investment, while commercial-grade weed barriers and geotextiles add a smaller secondary cost. Investing in high-quality materials during this phase is the most effective way to ensure your synthetic lawn remains a stress-free, beautiful asset to your property for many years.