

How to Repair a Hole in Artificial Turf: A Professional Restoration Guide (2026)
What if the only thing standing between your pristine sanctuary and a total replacement cost of up to $10,000 is a single, invisible seam? Discovering a tear or a heat-damaged spot in your synthetic lawn is frustrating, especially when you’ve invested in a premium outdoor lifestyle. You likely worry that a DIY attempt might leave behind a tacky, visible scar that ruins the aesthetic of your property. We understand that your time and the beauty of your home are your most valuable assets.
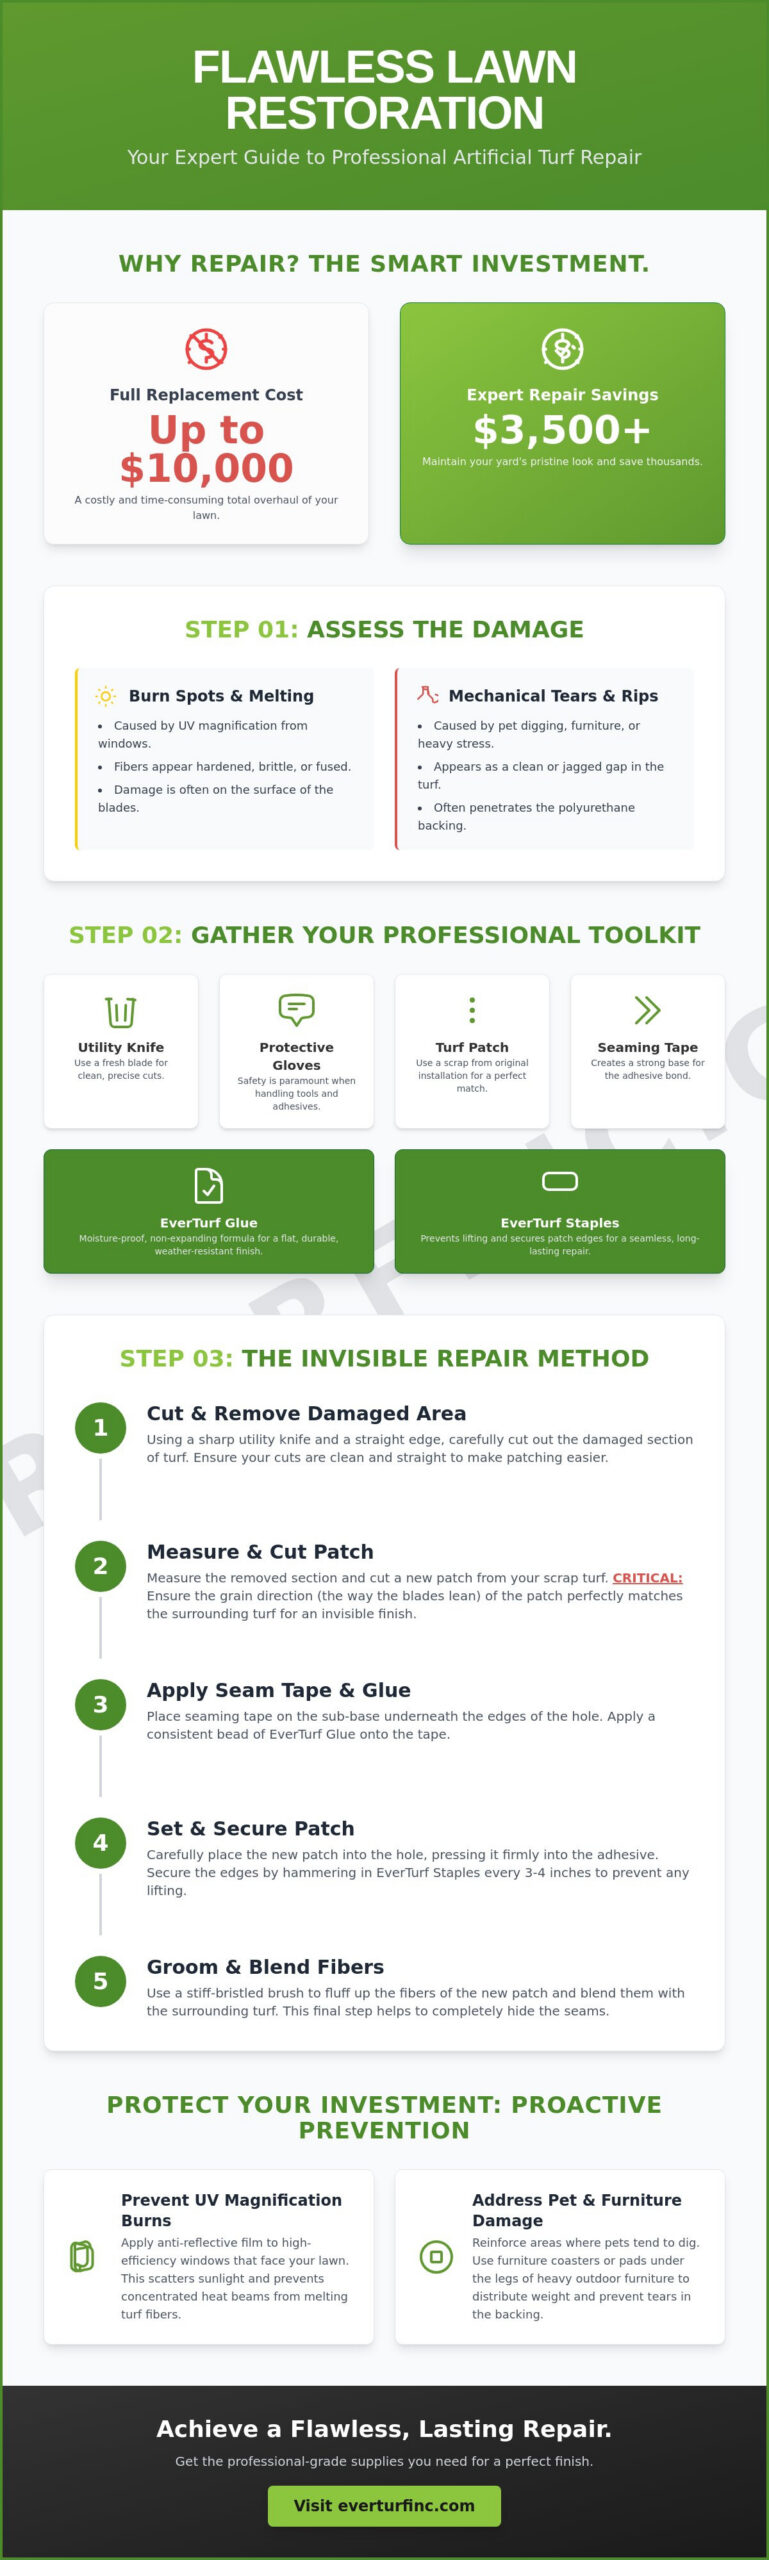
You can achieve a flawless result without the stress of a full renovation. This expert-led guide teaches you exactly how to repair a hole in artificial turf using professional techniques that restore both durability and grace. By choosing a meticulous repair over a full replacement, homeowners often save $3,500 or more while maintaining their yard’s year-round tranquility. We will walk you through selecting the right EverTurf Staples and Glue, mastering grain alignment for an invisible finish, and implementing proactive maintenance to protect your investment for the long term.
Key Takeaways
- Evaluate the severity of your lawn’s damage by distinguishing between surface-level fiber melting and deep structural tears to ensure a successful restoration.
- Master the professional techniques for how to repair a hole in artificial turf using EverTurf Staples and Glue for a durable, weather-resistant finish.
- Create a seamless, invisible patch by precisely matching grain direction and properly preparing the sub-base for a flawless aesthetic.
- Solve common frustrations like “caving in” and heat-related burns with expert troubleshooting tips that restore your turf’s original beauty.
- Preserve your sanctuary’s longevity by learning how to prevent future damage from UV magnification and pet activity.
Assessing Artificial Turf Damage: Is Your Lawn Repairable?
A flawless yard is a sanctuary, but even the most resilient spaces encounter wear. Before you begin the restoration process, you must evaluate the landscape’s integrity. Not every imperfection requires a surgical intervention. Understanding the difference between a superficial burn and a structural failure is the cornerstone of a successful repair. If you’re wondering how to repair a hole in artificial turf, the first step is determining if the backing remains intact or if the sub-base has shifted beneath the surface.
Surface-level fiber melting often results from UV magnification. This occurs when sunlight reflects off high-efficiency windows, creating a concentrated heat beam that singes the artificial grass blades. Conversely, mechanical tears from pet digging or heavy furniture friction usually penetrate the poly-urethane backing. Determining how to repair a hole in artificial turf begins with a physical inspection of the turf’s foundation. If the hole is larger than a few inches, or if you notice the surrounding area sinking, the sub-base might be compromised by drainage issues or soil erosion. In these cases, a simple patch won’t suffice; you’ll need to rebuild the foundation first to ensure a level, everlasting result.
Identifying Burn Spots vs. Mechanical Tears
Look closely at the damaged area. Burn spots often appear as localized, hardened clusters of fibers that feel brittle to the touch. This is frequently caused by window reflections. If the damage is purely on the tips of the blades, a vigorous brushing with a stiff-bristled comb might restore the look. However, if the fibers have fused into a solid mass, you must cut out the section. Mechanical damage, such as a seam pulling apart, looks like a clean or jagged gap. This indicates installation failure or excessive physical stress rather than heat exposure.
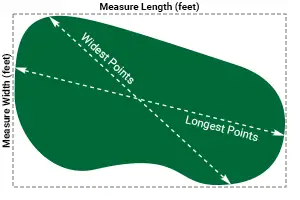
The ‘Invisible Patch’ Feasibility Test
An invisible repair depends entirely on color harmony. Sun exposure can subtly fade turf over several years, making a brand-new patch stand out. Compare a leftover scrap from your original installation to the current lawn. If the contrast is too sharp, you may need to harvest a small piece from a hidden corner of your yard or a low-visibility area. Finally, test the ‘give’ of the surrounding backing. If the material feels crumbly or weak, it won’t hold the adhesive properly, and a larger section replacement may be the more reliable path to restoring your outdoor sanctuary.
Essential Tools and Materials for Professional Turf Repair
Mastering the art of restoration begins with your toolkit. While some might suggest common household adhesives, the secret to a professional finish lies in specialized components. Learning how to repair a hole in artificial turf requires more than just technique; it demands the right arsenal to ensure the patch withstands the elements and remains hidden from the naked eye. Using generic hardware store supplies often leads to visible seams or bonds that fail after the first heavy rain. To achieve a result that mirrors the quality of a new installation, you must prioritize materials designed for the unique chemistry of synthetic fibers.
Adhesives and Fasteners: The EverTurf Advantage
The foundation of any durable repair is the bond between the turf backing and the seaming tape. EverTurf Glue is specifically formulated to create a moisture-proof seal that remains flexible. Unlike standard construction adhesives that may expand and create unsightly lumps under your feet, this non-expanding formula ensures the surface stays perfectly flat. This is vital for maintaining the tranquility of your lawn through seasonal temperature shifts. For added security, especially around the edges of a new patch, you’ll want to utilize professional-grade fasteners. Properly spacing EverTurf Staples and Glue every few inches prevents the “lifting” effect that often plagues DIY projects. This combination provides the logical evidence of quality that every homeowner seeks when protecting their premium investment.
Precision Cutting and Grooming Tools
Precise cuts are non-negotiable for an invisible seam. A high-quality utility knife with a fresh, replaceable blade is your most important asset. You’ll need to change the blade frequently; a dull edge will snag the poly-urethane backing rather than slicing it cleanly, leading to frayed fibers that catch the light and reveal the repair. Safety is equally paramount. Always wear protective gloves and use a straight edge to guide your cuts. Once the patch is secured, the restoration isn’t complete until the fibers are groomed. A carpet kicker or a specialized power brush helps blend the new section with the surrounding lawn. This step is essential for aligning the grain direction, which is the most common mistake made during repairs. Finally, applying EverTurf Infill provides the necessary weight to keep the patch seated while helping the blades stand upright. This meticulous attention to detail transforms a simple fix into a permanent, sophisticated solution for your outdoor space.
Step-by-Step Guide: How to Patch a Hole in Artificial Grass
Restoring your lawn’s perfection requires a blend of patience and precision. Once you’ve gathered your professional tools, it’s time to execute the repair. Learning how to repair a hole in artificial turf is a rewarding process that brings immediate relief and returns your outdoor space to its tranquil state. Start by clearing the area. Use a vacuum or a stiff brush to remove all existing infill around the damage. This exposes the poly-urethane backing, allowing you to make a clean, surgical cut. Using your utility knife, cut out the damaged section in a simple geometric shape, such as a square or circle. A clean edge is much easier to hide than a jagged tear.
Prepare your replacement piece from your leftover scrap material. Ensure it’s the exact same shape as the hole you just created. Before applying any adhesive, dry-fit the piece to check for gaps. The goal is a snug fit where the backings touch but don’t overlap. This meticulous preparation ensures that once the EverTurf Glue is applied, the patch remains level with the rest of your lawn, preventing any tripping hazards or unsightly bumps.
The Critical Step: Matching the Grain Direction
Stand back and observe your lawn from several angles. You’ll notice the fibers have a distinct “lean” or grain direction. This is the most vital detail for an invisible finish. If you install the patch 180 degrees in the wrong direction, the light will reflect off the blades differently, making the repair look like a completely different color. Before you cut your replacement piece, identify this grain and mark the backing with an arrow. Aligning this arrow with the lean of your existing lawn ensures the new fibers blend seamlessly into the landscape, preserving the sophisticated aesthetic of your property.
Sealing the Seams for Longevity
Place your seaming tape directly onto the sub-base, centered under the hole. Apply EverTurf Glue in a consistent “S” pattern across the tape. This technique maximizes the surface area contact, creating a bond that won’t fail during heavy use or extreme weather. Gently press the patch into place, being careful not to trap any grass fibers in the adhesive. Use a small comb to pull any pinned fibers out from the seam. Once the patch is set, the restoration needs time to cure. Place a heavy object, like a bag of infill or a patio paver, on the area for 24 hours. This weighted curing process is the logic behind a permanent, professional-grade result. Finish by re-applying EverTurf Infill to weigh down the blades and hide the seam entirely.
Troubleshooting Common Repair Challenges: Burns, Sinking, and Pet Tears
Restoring the tranquility of your outdoor space requires looking beyond the surface. While a simple patch fixes a tear, some damage signals a need for a more comprehensive approach. Learning how to repair a hole in artificial turf often involves addressing what lies beneath the green. Whether you’re dealing with a mysterious sinkhole or persistent pet activity, the right troubleshooting steps ensure your restoration remains a permanent solution rather than a temporary fix. Addressing these nuances preserves the sophisticated aesthetic of your property for years to come.
Restoring a Sinking Sub-Base
A “caving in” effect usually points to sub-base failure. This happens when the underlying soil shifts or drainage issues wash away the foundation. To fix this, you must peel back the turf section to access the base material. Avoid the common mistake of filling the void with garden soil; this will only lead to more sinking. Instead, use crushed stone or a professional-grade base material. Add the material in thin layers, compacting each one thoroughly until the surface is level with the surrounding ground. This ensures proper drainage is maintained and prevents the repair from becoming a recurring frustration. Once the base is solid, you can re-apply your turf with confidence.
Pet Damage and Odor Remediation
Our furry companions are family, but their enthusiasm can lead to specific challenges. If you are dealing with tears caused by persistent digging, you’ll need to secure the edges of your repair with extra EverTurf Staples. Before you finalize the patch, address any trapped odors. Ammonia from pet waste can linger in the sub-base long after the surface is cleaned. Scrub the underlying base with a specialized enzymatic cleaner before applying your new artificial grass for dogs patch. Utilizing EverTurf Infill specifically designed for pet areas will help neutralize future odors, keeping your sanctuary fresh and inviting.
Melted spots from low-E window reflections or “peaking” seams where the turf has expanded also require a visionary’s touch. For melted fibers, a full cut-out is the only way to restore the texture. If your seams are peaking, it’s often a sign that the turf wasn’t given enough room to breathe during the initial installation. You’ll need to trim a fraction of an inch from the seam edges before re-gluing them to a flat, tension-free state. If you find these structural repairs overwhelming, we recommend consulting our experts for professional artificial turf installation near me to ensure your lawn remains a stress-free masterpiece.
Preventing Future Damage and Protecting Your Investment
While knowing how to repair a hole in artificial turf provides peace of mind, the most sophisticated homeowners prioritize prevention to maintain their yard’s everlasting beauty. A proactive approach transforms your outdoor space from a project into a permanent sanctuary. By understanding the environmental factors that affect synthetic fibers, you can protect your investment and ensure your lawn remains a worry-free environment for decades. Prevention isn’t just about avoiding repairs; it’s about preserving the logical and aesthetic value of your property.
One of the most effective ways to prevent fiber melting is the installation of non-reflective window film. As we discussed earlier, UV magnification from high-efficiency windows can create intense heat zones. This film redirects concentrated light away from your lawn, effectively neutralizing the risk of localized melting before it ever begins. Additionally, regular grooming is essential. Brushing your turf with a synthetic bristle broom prevents fibers from matting under foot traffic. This simple act reduces stress on the blades and keeps your backyard turf looking vibrant and lush throughout the seasons.
Proactive Maintenance Strategies
Establishing a quarterly schedule for grooming and debris removal is the best way to catch minor issues before they escalate. During these sessions, monitor high-traffic areas for early signs of seam separation or fiber thinning. Maintaining the correct turf infill level is your primary defense against backing damage. Infill acts as a protective cushion, shielding the poly-urethane backing from direct UV exposure and physical impact. Periodic top-offs with EverTurf Infill ensure the blades stay upright and the foundation remains secure, preserving the structural integrity of the entire system.
The EverTurf Commitment to Durability
Our high-performance products are engineered to withstand the rigors of the local climate and the demands of modern life. We utilize heat-resistant fibers and advanced backing technology to reduce the likelihood of mechanical tears or heat-related damage. This commitment to quality ensures that your transition to a low-maintenance lifestyle is both rewarding and permanent. If you encounter large-scale damage or simply want the assurance of an expert touch, contact EverTurf Inc for professional-grade repair supplies or installation support. We’re here to help you maintain the tranquility and sophistication of your perfect outdoor oasis.
Reclaim Your Perfect Outdoor Sanctuary
Restoring the seamless beauty of your lawn is more than a simple home project; it’s an investment in your personal time and tranquility. By mastering the nuances of grain alignment and sub-base restoration, you’ve gained the confidence to handle any challenge your landscape faces. You now understand that the secret to how to repair a hole in artificial turf lies in the combination of meticulous technique and professional-grade materials. Whether you’re fixing a minor pet tear or addressing a heat-related burn, your dedication to quality ensures an invisible, lasting result.
At EverTurf, we support your vision with national distribution of high-performance synthetic grass and expert-led guidance for both residential and commercial systems. Our specialized EverTurf Staples and Glue are engineered to create permanent bonds that withstand the test of time and weather. Restore your landscape with EverTurf’s professional-grade repair supplies. Your journey toward a stress-free, beautiful outdoor space is well within reach. Take pride in your restored environment and enjoy the year-round perfection you deserve.
Frequently Asked Questions
Can I fix a hole in artificial turf without a matching scrap piece?
You can harvest a small section of turf from a low visibility area, such as a hidden corner or under a heavy planter, to ensure an exact color match. If you don’t have leftover scraps from your original installation, this is the most reliable way to ensure the repair remains invisible. Using a different product will often result in a noticeable color contrast that disrupts the tranquility of your outdoor space.
How do I fix a melted spot on my synthetic grass?
Minor singeing can occasionally be improved by vigorously brushing the fibers with a stiff bristled brush to separate fused tips. However, significant melting requires you to cut out the damaged section and replace it with a fresh patch. This is a common scenario when learning how to repair a hole in artificial turf caused by window reflections, as the hardened mass cannot be restored to its original soft texture.
Why is my artificial turf sinking or caving in?
Sinking usually indicates that the underlying sub-base has shifted or washed away due to drainage issues or improper initial compaction. To resolve this, you must peel back the turf and add new crushed stone or base material to the depression. Compacting this new base in thin layers ensures a level surface and prevents future “caving in,” restoring the logical foundation and safety of your lawn.
What is the best glue for repairing artificial grass seams?
The most reliable choice is a specialized, non expanding poly-urethane adhesive like EverTurf Glue. Standard construction adhesives often expand as they cure, which creates unsightly lumps and an uneven walking surface. A professional grade turf adhesive provides a moisture proof, flexible bond that withstands extreme temperature shifts and heavy use without losing its integrity or sophisticated finish.
How long does a turf patch repair take to cure?
Most professional turf adhesives require a full 24 hours to cure completely and reach maximum bond strength. During this curing window, it is vital to keep the patch weighted down with a heavy object to ensure the backing maintains consistent contact with the seaming tape. Avoiding foot traffic on the area during these 24 hours prevents the edges from shifting and ensures a permanent restoration.
Will a patch in my artificial lawn be visible to guests?
A properly executed repair should be virtually invisible to the naked eye. The key to success is meticulously matching the grain direction of the fibers and using a power brush to blend the seams after the adhesive has set. When you follow the professional steps for how to repair a hole in artificial turf, the patch integrates seamlessly into the existing landscape, preserving your property’s pristine aesthetic.
Can I use regular carpet tape for turf repairs?
Regular carpet tape is not designed for outdoor use and lacks the moisture resistance required for a durable repair. Exposure to rain and UV rays will cause the adhesive to break down rapidly, leading to lifted edges and potential tripping hazards. Always utilize specialized seaming tape and professional adhesives designed to withstand the local climate and maintain a secure bond for the life of your turf.
How do I prevent my dog from digging holes in the artificial grass?
Deterring persistent diggers starts with securing all turf edges and seams with extra EverTurf Staples to remove any tempting “lift points.” If your pet is attracted to a specific spot, ensure the sub-base is clean and free of lingering odors by using enzymatic cleaners. Redirecting their energy with a designated play area can also help protect your premium investment from recurring mechanical damage.