


Preparing the Ground for Artificial Turf: The Definitive Guide to a Professional Foundation
Professional ground preparation is an engineering project, not a gardening task; the quality of your lawn is only as good as the invisible foundation beneath it. You likely envision a yard that remains pristine through every season, yet it’s natural to worry about standing water, lingering pet odors, or the frustration of weeds poking through your investment. Properly preparing the ground for artificial turf is the only way to transform those anxieties into the tranquility of a perfect outdoor space that stays level and beautiful for decades.
It’s time to move away from the constant maintenance of traditional grass and embrace a sophisticated, permanent solution for your home. This guide helps you master the essential engineering steps required to create a flawless, high-drainage foundation for your EverTurf synthetic lawn. We’ll explore exactly how to manage heavy rain without puddling and ensure your surface feels lush and soft rather than uneven or crunchy. You’ll gain the technical clarity needed to protect your investment and enjoy a smooth, year-round green space that truly restores your personal time.
Key Takeaways
- Understand why 70% of a successful installation remains hidden and how this “invisible foundation” dictates the longevity of your landscape.
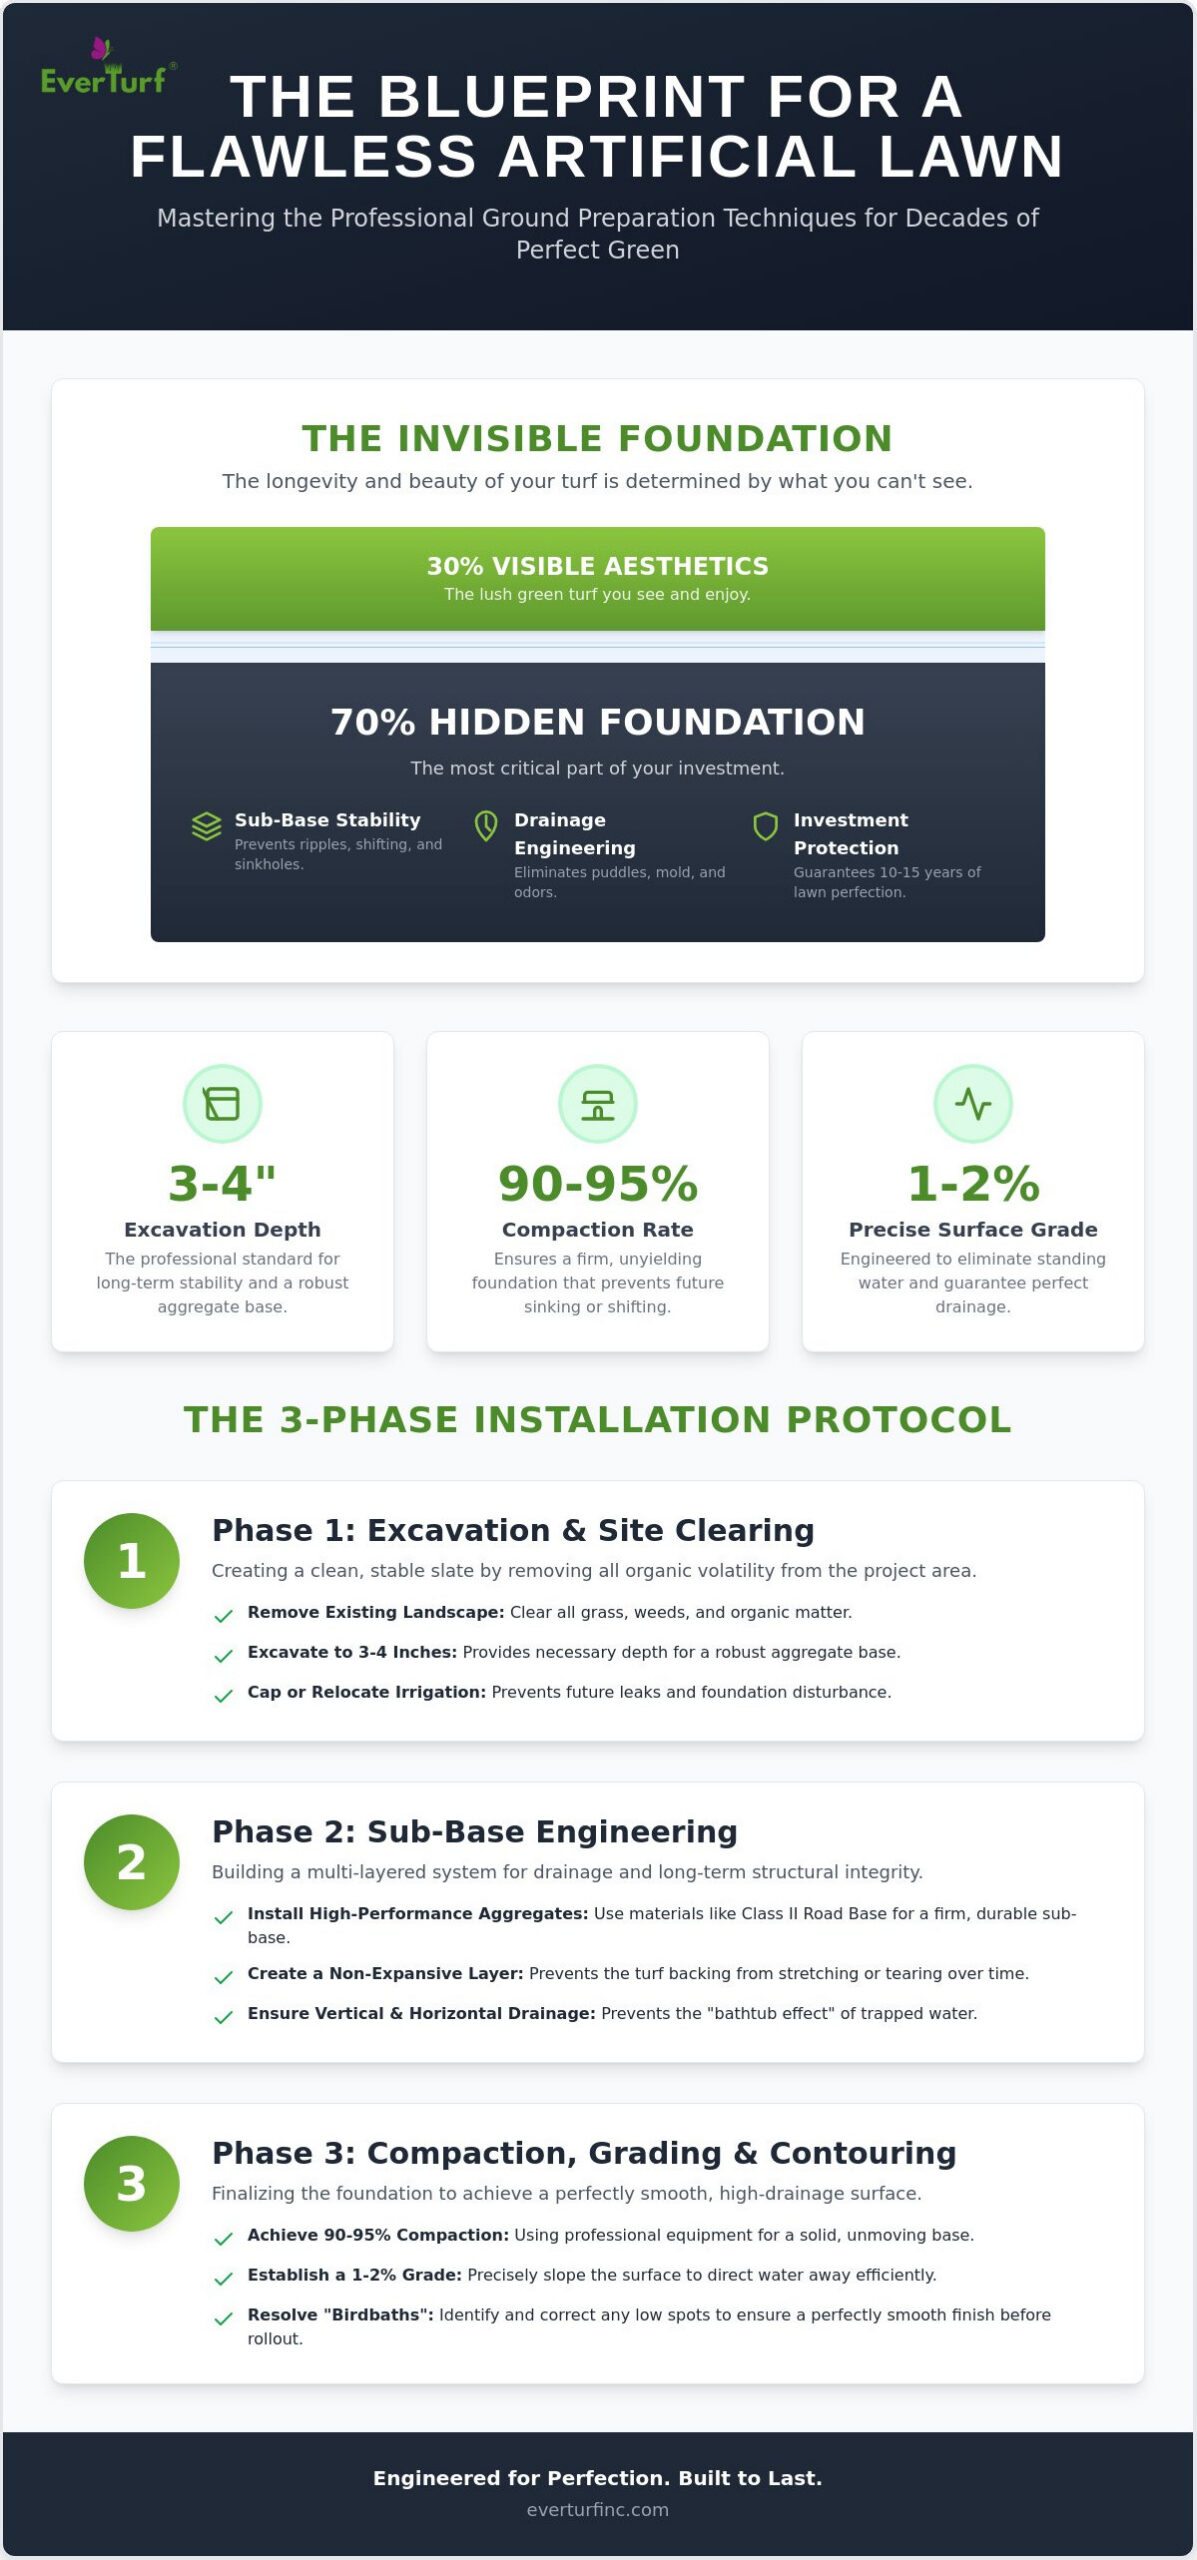
- Master the professional standards for preparing the ground for artificial turf, including the critical 3-4 inch excavation depth required for long-term stability.
- Discover how to select high-performance aggregates like Class II Road Base to create a firm, durable sub-base that prevents shifting and sinking.
- Learn engineering techniques for achieving 90-95% compaction and a precise 1-2% grade to eliminate standing water and ensure perfect drainage.
- Identify and resolve “birdbaths” or low spots before the final rollout to achieve a perfectly smooth finish using EverTurf Staples and Glue.
The Invisible Foundation: Why Ground Prep Dictates Turf Longevity
Think of your new lawn as a high-performance vehicle. While the exterior aesthetics grab your attention, the engine beneath the hood determines how long it stays on the road. In the world of synthetic landscaping, about 70% of a successful project is hidden beneath the surface. This “iceberg effect” means that what you don’t see is actually the most critical part of your investment. Properly preparing the ground for artificial turf involves building a multi-layered sub-base system that mimics the natural drainage and stability of the earth while removing the volatility of raw soil.
When this foundation is neglected, the consequences are both visible and frustrating. You might notice unsightly ripples, shifting seams, or even dangerous sinkholes as the native soil expands and contracts with the weather. Understanding the History and development of artificial turf shows us that modern installations have evolved far beyond simple green carpets. Today, we utilize a combination of vertical and peripheral drainage strategies to ensure your yard remains dry, stable, and odor-free for decades.
The Role of Drainage Engineering
A flawless lawn must do more than look good; it must breathe and drain. High-performance turf systems rely on sophisticated drainage engineering to move water away from the surface instantly. If you simply “dig a hole” and drop turf inside, you risk creating the “bathtub effect.” This happens when water becomes trapped between the synthetic backing and the compacted native soil, leading to mold growth and stagnant odors. By analyzing the percolation rates of your specific soil type, pros can design a sub-base that allows water to move vertically through the turf and then horizontally toward a designated runoff point. This technical precision ensures your space remains a sanctuary even after a heavy downpour.
Protecting Your Investment
Choosing premium artificial grass is the first step toward a beautiful home, but the foundation is what keeps it looking new. A stable, non-expansive base prevents the turf backing from stretching or tearing over time. This is especially vital for maintaining seam integrity. If the ground shifts even a fraction of an inch, those invisible seams can pull apart, creating gaps that ruin the lush aesthetic. While sub-base work is a significant factor in the total artificial turf installation cost, it’s the only way to guarantee your lawn lasts 10 to 15 years. Investing in professional preparing the ground for artificial turf today saves you from the stress and expense of major repairs tomorrow.
Phase 1: Excavation and Site Clearing Protocols
Transformation begins with a clean slate. To achieve a surface that remains perfectly level for a decade or more, you must first remove the volatility of the existing landscape. While some budget-focused guides suggest a shallow two-inch dig, professional standards dictate a benchmark excavation depth of three to four inches. This deeper cut is vital for preparing the ground for artificial turf in regions with expansive clay soils or for lawns expecting high foot traffic. It provides the necessary volume for a robust aggregate base that won’t shift or sink when the seasons change.
During this phase, clearing goes beyond just removing the green layer. You must identify and extract stubborn root systems and organic matter that could decompose and create underground voids. Managing the “spoils” is a logistical task that requires careful planning. Transporting and disposing of old sod and soil involves significant hauling and local tipping fees, requiring dedicated equipment to keep the site clean. Before you introduce new materials, ensure all existing irrigation lines are capped or relocated. Moving sprinkler heads to the periphery of your new EverTurf space prevents future leaks and ensures your foundation remains undisturbed. If you’re managing a complex yard with multiple elevations, seeking a professional artificial grass installation can ensure these technical steps are executed with precision.
Soil Stabilization and Weed Prevention
Once the area is cleared, use the “scalping” technique to smooth the sub-grade. This involves removing any remaining tufts of growth to create a uniform floor. Treat the exposed earth with non-toxic weed suppressors to prevent dormant seeds from germinating beneath your turf. While a geo-textile weed barrier is standard for most residential yards, you should avoid it in dedicated pet areas. In those specific zones, the fabric can trap uric acid and lead to lingering odors. Instead, rely on specialized infills and superior drainage to keep the space fresh.
Addressing Underground Utilities
Safety is the silent partner of every successful excavation. Even for shallow turf projects, you must call 811 to locate underground utilities before the first shovel hits the dirt. This service identifies essential electrical lines for landscape lighting and shallow gas lines that often run through residential backyards. Protecting these assets during the dig preserves your home’s infrastructure and prevents costly emergency repairs. By respecting the hidden complexities of your property, you build a foundation that is as safe as it is beautiful.
Phase 2: Sub-Base Engineering and Material Selection
Once the excavation is complete, the engineering phase of preparing the ground for artificial turf truly begins. This is where you build the structural integrity that prevents your lawn from feeling “crunchy” or looking uneven over time. The choice of aggregate is a critical decision; you need materials that lock together under pressure. Crushed stone is vastly superior to rounded pea gravel. While pea gravel shifts like marbles underfoot, crushed aggregates feature jagged edges that interlock, creating a stable, unyielding surface that feels as firm as a natural floor.
Precision matters when ordering your materials. To calculate the volume needed, use the standard cubic yard formula: multiply your total square footage by the desired depth in inches, then divide by 324. For a standard four-inch base, you’ll need roughly one cubic yard for every 80 square feet. When the material arrives, don’t dump it all at once. Professional installers use the “Lift” method, applying and compacting the base in two-inch increments. This ensures that the bottom layers are just as dense as the top, preventing deep-seated settling years down the line.
Choosing the Right Base for Your Project
Different lifestyles require different foundations. For a standard backyard turf installation, Class II Road Base is the industry gold standard due to its incredible durability and compaction rating. However, if you’re installing an EverTurf Putting Green, you’ll want a final layer of Decomposed Granite (DG). DG provides a finer, smoother finish that’s essential for a true ball roll. In regions with heavy rainfall, consider a fully permeable open-graded aggregate to maximize drainage speed and prevent water from backing up during storms.
The Danger of Using Only Sand
Many DIY guides mistakenly suggest using sharp sand as a primary base layer. This is a recipe for long-term disappointment. Sand doesn’t possess the necessary structural stability, which is the ability of a base to resist shifting under 90% compaction. It’s prone to “tracking,” where foot traffic creates permanent indentations and ripples that ruin the aesthetic of your lawn. Pet owners should be especially cautious; sand is highly absorbent and traps pet urea within its grains. This leads to persistent odors that are almost impossible to wash away. A professional foundation relies on stone for strength, ensuring your investment remains pristine, level, and fresh-smelling for the long haul.
Phase 3: Compaction, Grading, and Contouring
Engineering the proper grade is equally vital for longevity. You should aim for a subtle 1-2% slope, often called a “crown” or “fall,” to direct surface runoff away from your home’s foundation. This prevents the “bathtub effect” mentioned earlier and ensures your yard remains usable even minutes after a storm. To maintain this shape, install bender boards or concrete curbing along the perimeter. These edges act as a frame, holding the compacted base in place and providing a clean, crisp line for the final turf tuck. For homeowners who want to ensure every millimeter is perfect, a professional artificial turf installation provides the heavy equipment and laser-leveling tools needed for a flawless finish.
The final touch is the “Screeding” process. Using a long, straight edge or a specialized screed bar, installers smooth out the top layer of fine aggregate. This removes tiny ridges and dips, resulting in a billiard-table smooth surface. It’s this attention to detail that separates a DIY project from a professional-grade sanctuary.
Compaction Tools and Techniques
While a vibratory plate compactor handles the wide-open spaces, you’ll need a hand tamp for tight corners and edges near delicate hardscapes. Once the base is fully compacted, some pros apply a “Broom Finish” by lightly scuffing the surface. This creates a microscopic texture that helps the turf backing grip the base, preventing micro-shifts during high-energy play. You can verify the density yourself with the “Heel Test.” Walk across the base in your work boots; if your heel leaves a visible indentation, the ground needs another pass with the compactor.
Specialized Grading for Sports and Golf
When you prepare the ground for EverTurf Putting Green Pro, the tolerance for error disappears. A “true” ball roll requires a surface that’s significantly smoother than a standard lawn. This often involves creating subtle undulations and breaks that mimic a professional golf course. Achieving this requires masterful contouring of the sub-base before the turf is ever rolled out. The base must be perfectly flush with any surrounding pavers or existing hardscapes to ensure a seamless transition that looks as good as it performs. Properly preparing the ground for artificial turf in a sports context means balancing these aesthetic contours with the rigorous compaction required for athletic movement.
Finalizing the Foundation: EverTurf Integration
Complete your engineering journey with a meticulous final inspection. Before the first roll of synthetic grass unfurls, you must scan the surface for “birdbaths” or subtle low spots. These minor depressions are easy to miss, yet they can lead to localized pooling if you leave them unaddressed. If you find a dip, add a small amount of fine aggregate, re-moisten, and compact the area until it’s flush with the surrounding grade. This final verification serves as the ultimate insurance policy for your landscape. When you spend time preparing the ground for artificial turf with this level of detail, you eliminate the risk of future maintenance headaches and ensure a smooth, lush result.
A flawlessly prepped foundation turns the actual installation into a streamlined, satisfying process. Because the base is uniform and dense, EverTurf Staples and Glue do their jobs with maximum efficiency. Staples bite deep into the compacted stone without hitting loose pockets, while the glue bonds securely to a clean, grit-free perimeter. This structural harmony ensures your lawn remains anchored through heavy use, high winds, and lively family gatherings. It’s the difference between a surface that shifts and one that remains an everlasting part of your home.
Once the turf is secured, the addition of turf infill acts as the final protective layer for your foundation. While the stone sub-base provides the strength, the infill protects the turf backing from UV degradation and helps regulate surface temperatures during peak summer months. It’s the finishing touch that keeps your fibers standing tall and your foundation shielded from the elements, preserving the integrity of the work you’ve done beneath the surface.
Pet-Specific Foundation Additives
For households with active pets, preparing the ground for artificial turf involves a few extra layers of sophisticated protection. When installing artificial grass for dogs, consider integrating antimicrobial additives directly into the sub-base. These specialized layers work in tandem with EverTurf Infill to neutralize odors at the source. Ensure your perimeter drainage is particularly robust in high-traffic pet runs to allow for frequent rinsing without saturating the base. This proactive approach guarantees a fresh, pristine sanctuary for your furry family members.
Ready to Transform Your Landscape?
Professional ground preparation is the “secret sauce” that makes an EverTurf lawn look and feel like a high-end estate. By following these engineering protocols, you’ve moved beyond simple gardening into the realm of lasting property enhancement. You’ve traded the stress of traditional lawn care for the tranquility of a perfect, year-round green space. If you’re ready to start your journey, ensure you source your materials from a distributor that values quality and durability. Explore EverTurf High-Performance Solutions today and take the first step toward your worry-free outdoor oasis.
Build Your Everlasting Oasis with Engineering Excellence
You now recognize that a flawless lawn is an engineering triumph rather than a simple gardening task. By mastering the invisible layers, from deep excavation to interlocking aggregate selection, you ensure your property remains pristine for decades. Correctly preparing the ground for artificial turf is the single most important step in protecting your investment against ripples, odors, and drainage failures. This technical precision doesn’t just create beauty; it restores your personal time and provides the tranquility of a maintenance-free lifestyle.
We offer specialized solutions for pets, high-energy play areas, and pro-level golf greens that demand a true ball roll. Our systems utilize high-performance drainage engineering and a national distribution of premium installation accessories to guarantee success. You deserve a sophisticated, permanent solution that stands up to the local climate while enhancing your home’s value. Start Your Transformation with EverTurf Artificial Grass today. Your journey toward a more beautiful and stress-free outdoor space is just beginning.
Frequently Asked Questions
Can I install artificial turf directly on top of my existing dirt or grass?
Direct installation on grass or dirt is never recommended because organic matter eventually decomposes and creates unstable underground voids. This shortcut leads to sunken areas and poor drainage that compromise the entire project’s integrity. Properly preparing the ground for artificial turf requires removing the living layer to ensure a stable, engineered foundation that remains level and beautiful for years to come.
How deep do I need to dig for a proper artificial turf base?
A standard excavation depth of three to four inches is the professional benchmark for most residential projects. This depth allows for a robust sub-base that can handle foot traffic and environmental shifts without sinking. While some suggest shallower cuts, a four-inch excavation provides the necessary volume for high-quality aggregates that guarantee long-term structural integrity and superior drainage performance across your property.
What is the best material to use for a turf sub-base?
Class II Road Base is the superior choice for general landscaping because it interlocks to create a firm, unyielding foundation. For projects requiring an ultra-smooth finish, such as a professional putting green, Decomposed Granite provides the fine texture needed for precision ball roll. Avoid using rounded stones like pea gravel, as they shift under pressure and fail to provide the stability your synthetic lawn requires.
Do I need a weed barrier under my artificial grass?
You should typically use a geo-textile weed barrier to prevent dormant seeds from surfacing through your new turf. However, pet owners should skip this layer in designated relief areas to maintain a fresh environment. In pet zones, the fabric can trap uric acid and lead to persistent odors. Instead, rely on antimicrobial infills and a high-drainage aggregate base to keep the space clean.
How do I ensure my artificial turf drains properly after a heavy rain?
Achieving a subtle 1-2% grade is the most effective way to ensure your yard handles heavy rainfall without puddling. This slope directs water toward the periphery of your property rather than allowing it to sit beneath the turf backing. When combined with a permeable aggregate base, this engineering ensures your outdoor space remains dry and ready for use minutes after a storm passes.
What happens if the ground isn’t compacted correctly before laying turf?
Poor compaction leads to unsightly ripples, shifting seams, and a “crunchy” or uneven sensation when you walk across the lawn. Without reaching 90-95% density, the base will naturally settle into the earth’s voids over time, ruining the smooth aesthetic you’ve worked to achieve. Using the “Water and Whack” method ensures your foundation stays rock-solid and supports the turf’s weight permanently.
Is it possible to prep the ground for turf on a slope or hill?
Prepping a slope is entirely possible and often enhances the natural beauty of a property through careful contouring. You must use bender boards or concrete curbing to frame the aggregate and prevent it from washing out during the compaction process. This stabilization keeps the sub-base secure on an incline, allowing you to enjoy a lush, green hillside that requires zero mowing or maintenance.
How much does the base material usually cost for a standard backyard?
The cost of base materials varies based on the depth of excavation and the specific aggregate selected for your project’s unique needs. Factors like your property’s accessibility and the volume of soil being removed also influence the final investment. While prices fluctuate, investing in high-quality crushed stone ensures your foundation lasts for decades, protecting the value of your synthetic lawn and preventing expensive future repairs.