
How to Fix Bad Artificial Turf Installation: A Restoration Guide
A botched artificial turf installation isn’t a death sentence for your landscape, but it is a silent thief of the tranquility and beauty you were promised. You likely made the switch to synthetic grass to escape the relentless cycle of mowing and watering, only to find yourself frustrated by visible seams, tripping hazards, or persistent pet odors. It’s disheartening to see a premium investment marred by technical errors that make your yard feel more like a source of stress than a sanctuary.
The good news is that most common failures are reversible with the right diagnostic approach and professional-grade materials. In this restoration guide, you’ll learn exactly how to fix bad artificial turf installation by identifying sub-base issues and applying the same high-performance fixes used by industry experts. We’ll walk through the process of smoothing out wrinkles, securing loose joints with EverTurf Staples and Glue, and restoring drainage with specialized EverTurf Infill. By the end, you’ll have the clarity and confidence to transform a frustrating eyesore back into the lush, worry-free environment you deserve.
Key Takeaways
- Identify visual and functional red flags early, such as “mohair” fraying or spongy spots, to prevent minor installation errors from becoming costly failures.
- Discover how to fix bad artificial turf installation by employing surgical repair techniques for failed seams and wrinkles to restore a seamless, natural appearance.
- Utilize professional-grade EverTurf Staples and Glue to secure loose edges and ensure your lawn remains a safe, trip-free environment.
- Resolve persistent pet odors and drainage issues by diagnosing sub-base clogs and implementing effective permeability fixes.
- Evaluate the long-term value of your investment by weighing the costs of surgical repairs against the benefits of a full EverTurf replacement.
Identifying the Signs of a Failed Artificial Turf Installation
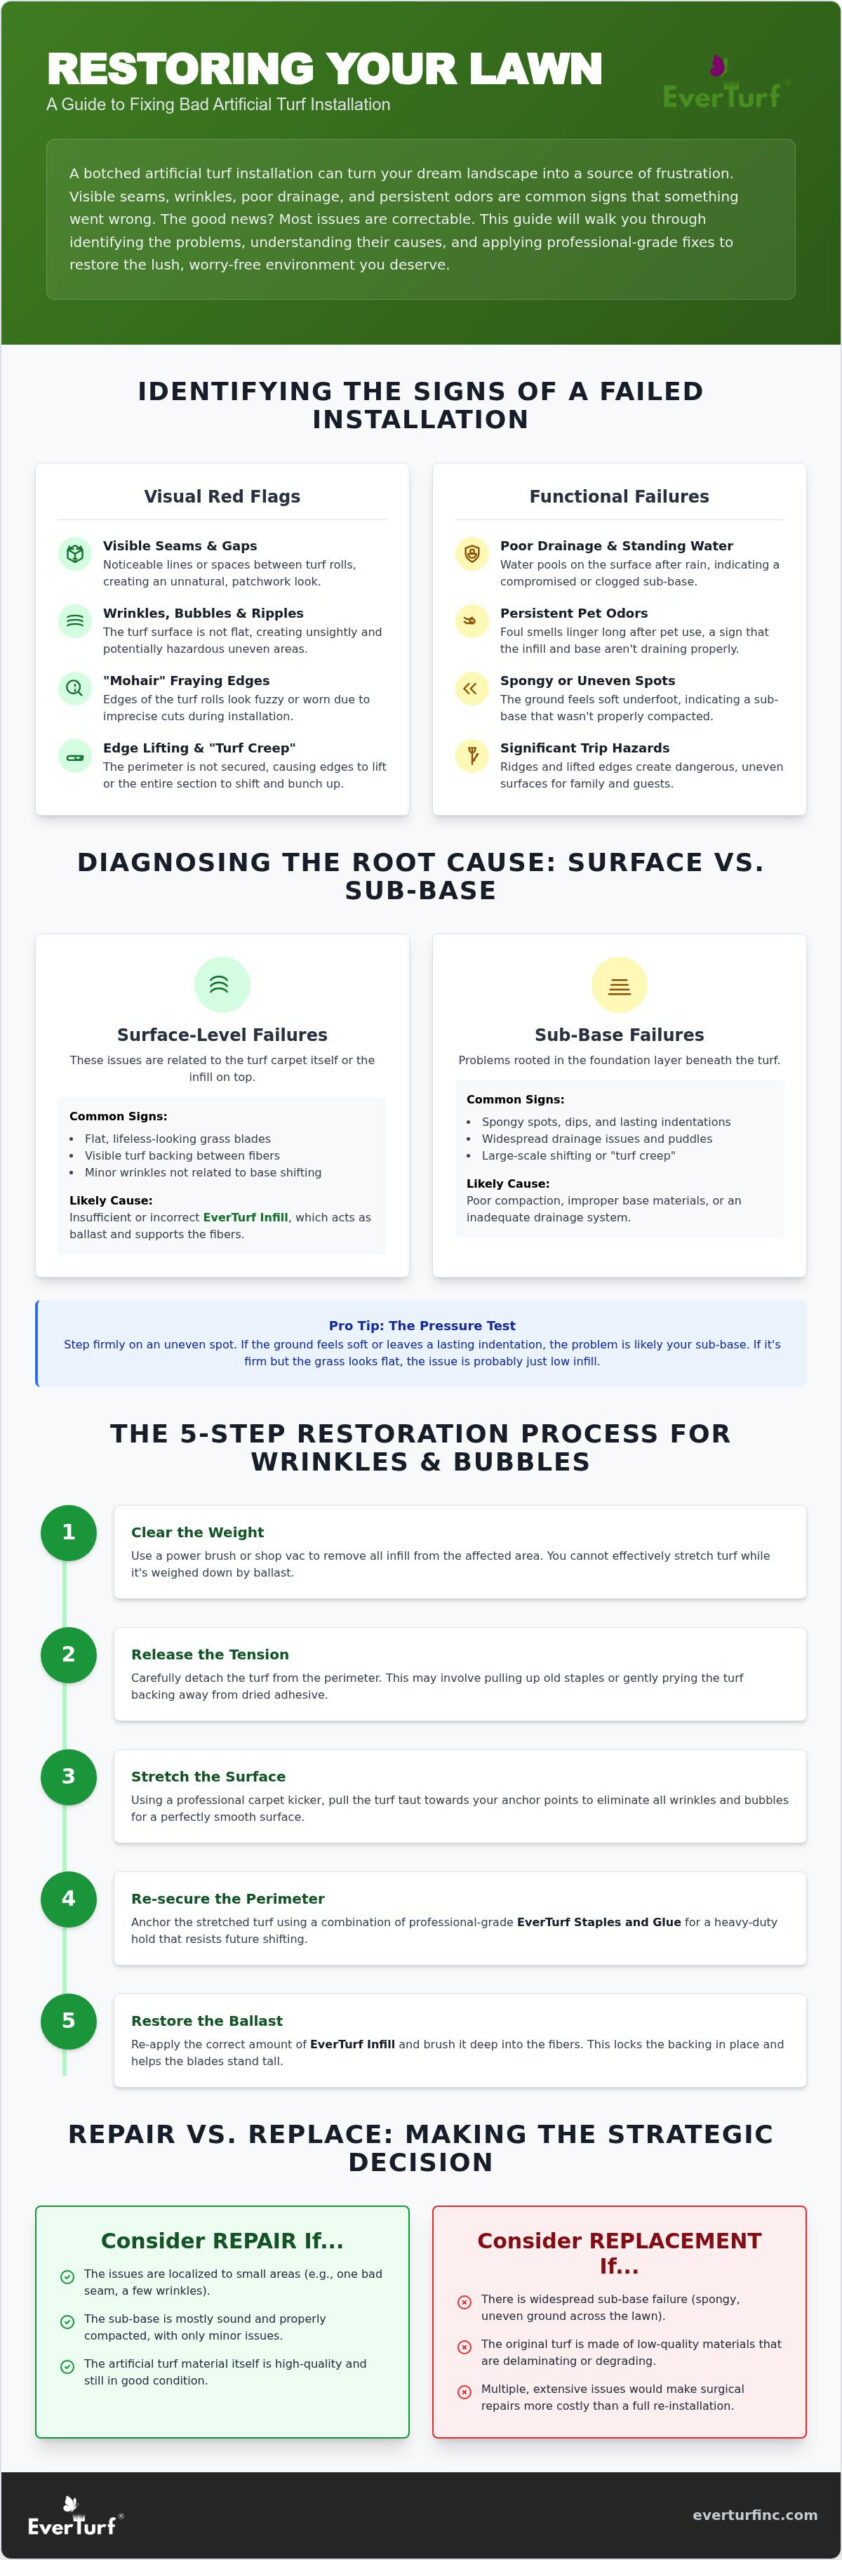
Recognizing a failing lawn is the first step toward reclaiming your outdoor sanctuary. When you invested in synthetic grass, you expected a pristine, evergreen vista; seeing visible seams or ripples instead can be deeply frustrating. Understanding the symptoms of a poor install is essential for anyone wondering how to fix bad artificial turf installation without starting from scratch. These issues often begin as minor visual annoyances but can quickly evolve into structural failures that compromise the longevity of your property.
Visual red flags are often the most jarring. You might notice “mohair” fraying, where the edges of the turf rolls look fuzzy or worn because they weren’t cut precisely during the initial lay. Edge lifting is another common grievance, typically indicating that the perimeter wasn’t secured with professional-grade EverTurf Staples and Glue. These aesthetic flaws are more than just eyesores; they represent a breakdown in the system’s integrity that allows debris and moisture to penetrate beneath the surface.
Functional failures often lurk beneath the surface but manifest in ways that disrupt your lifestyle. Standing water after a light rain or persistent pet odors suggest that the drainage system is compromised. You might also notice “turf creep,” a phenomenon where the grass appears to shift or migrate. This happens when the material isn’t properly anchored, allowing it to expand and contract with temperature swings until it bunches into unsightly, dangerous ridges that create significant trip hazards for family and guests.
Surface vs. Sub-Base Failures
Determining whether your issue is localized to the carpet or rooted in the ground beneath is vital for a successful restoration. When researching how to fix bad artificial turf installation, you should first perform a simple “pressure test” by stepping firmly on any spongy or uneven spots. If the ground feels soft or leaves a lasting indentation, your sub-base likely suffered from poor compaction or improper base materials. However, if the blades simply look flat or lifeless, your EverTurf Infill levels might be the only culprit. Proper infill acts as ballast, keeping the fibers upright and protecting the backing from UV damage.
For homeowners who find that their sub-base requires more than just a minor touch-up, you can discover Anything Skid Steer for professional grading and site preparation services that prevent future settling.
The Role of Poor Quality Materials
A beautiful lawn requires more than just skilled labor; it demands high-performance components. Low-density backing is a frequent cause of premature wrinkling because it lacks the weight and tension to stay flat over time. Delamination is the separation of turf backing due to poor manufacturing. A foundational step in understanding artificial turf is recognizing that the backing and infill must work as a cohesive system to provide durability. Choosing the wrong infill can lead to excessive heat retention or drainage clogs, undermining the tranquility of your outdoor space and leading to a premature decline of the entire system.
How to Fix Wrinkles and Bubbles in Artificial Grass
Bubbles and ripples in your lawn are more than just visual distractions; they’re signs that your turf is struggling against the elements. These imperfections usually occur when the material wasn’t properly stretched or secured during the initial lay. Learning how to fix bad artificial turf installation often starts with addressing these unsightly ridges to restore the smooth, tranquil surface you envisioned. By following a methodical restoration process, you can eliminate these hazards and ensure your investment remains secure for years to come.
The repair process requires a systematic approach to tension and anchoring:
- Step 1: Clear the weight. Use a power brush or a high-powered shop vac to remove the existing infill from the affected area. You cannot stretch turf while it’s weighed down by ballast.
- Step 2: Release the tension. Carefully detach the turf from the perimeter or the closest affected edges. This may involve pulling up old staples or gently prying the backing away from dried adhesive.
- Step 3: Stretch the surface. Use a professional carpet kicker to pull the turf toward your anchor points. This tool allows you to apply precise tension without tearing the backing.
- Step 4: Re-secure the perimeter. Once the wrinkles are gone, anchor the turf using professional-grade EverTurf Staples and Glue. This combination provides the heavy-duty hold needed to resist future shifting.
- Step 5: Restore the ballast. Re-apply EverTurf Infill across the surface. Brushing the infill deep into the fibers locks the backing in place and helps the blades stand tall and natural.
Using a Carpet Kicker Properly
Success with a carpet kicker depends largely on timing and technique. It’s best to perform this repair during the heat of the day when the turf is most pliable; sun-warmed fibers stretch more easily and are less likely to resist the kicker’s teeth. Always kick in the direction of the grain to maintain a uniform look across your lawn. This directional stretching ensures that once you’ve removed the bubbles, the blades align perfectly with the rest of your EverTurf Artificial grass.
Securing the Perimeter for Good
While these stretching methods are specific to synthetic lawns, they are actually borrowed from the world of indoor flooring restoration; if you’re interested in how these professional techniques apply to home interiors, you can visit Carpet Repair Magic to learn from specialists with nearly 50 years of experience in the trade.
A permanent fix requires a robust anchoring strategy. When re-securing your edges, place staples every six inches to prevent the “creep” mentioned in previous sections. For sections bordering concrete or pavers, a high-strength adhesive is often superior to mechanical fasteners. For more insights on maintaining a pristine landscape, consult the ultimate guide to artificial grass. If you’re looking for the right tools to finish the job, you can find professional EverTurf accessories designed for lasting results.
Repairing Visible Seams and Gaps Between Turf Rolls
Visible seams are the most common indicator of a subpar job, often caused by adhesive breakdown or improper cutting techniques. If you’re looking for how to fix bad artificial turf installation, addressing these gaps is a high-priority task that restores the seamless, high-end look of your property. Seams typically fail because the installer skipped the “S-cut” method or used insufficient adhesive, leaving the rolls to pull apart as the ground shifts over time. These gaps don’t just ruin the aesthetic; they create entry points for debris and weeds that can undermine your sub-base.
A “surgical” seam fix involves more than just pulling the edges together. You must cut back the damaged or frayed edges of both rolls to create a clean, straight start. Once you have two crisp edges, lay down a fresh strip of seam tape centered under the join. Apply EverTurf Glue using a glue comb to ensure an even, ridged layer of adhesive. This technique prevents messy overflow from seeping into the grass blades while providing the maximum surface area for a permanent, weather-resistant bond.
The Seam Tape and Glue Method
Choosing the right materials is half the battle in a successful restoration. For high-traffic areas or residential lawns with active pets, a wider 12-inch seam tape provides a larger bonding surface to resist heavy foot traffic and shifting. After applying the EverTurf Glue, fold the turf edges back together and press them firmly into the adhesive. Weighting the seam is a critical, often overlooked step. Use sandbags or heavy boards to keep the turf in full contact with the tape during the curing process. Since curing times can vary based on local humidity, check the specific EverTurf instructions and keep pets and family off the area until the bond is fully set.
Blending the Grain After Repair
Once the adhesive has fully cured, the final step is masking the repair to achieve that natural look. Grain direction is the lean of the fibers that must match perfectly between two rolls for an invisible seam. Use a stiff-bristled brush to pull the fibers upright and blend them across the seam line. Adding a fresh layer of EverTurf Infill provides the necessary support to keep these fibers standing tall. This ballast doesn’t just hold the turf down; it hides the transition point, ensuring your lawn looks like a single, cohesive masterpiece rather than a collection of separate pieces.
Correcting Drainage Issues and Foul Odors
Standing water and lingering smells can quickly turn a premium outdoor space into a source of stress. These issues often stem from shortcuts taken during the initial ground preparation or the selection of inferior materials. If you’re struggling with how to fix bad artificial turf installation that has become swampy or unpleasant, the solution lies in restoring the path of least resistance for moisture. Proper drainage is the lifeblood of a low-maintenance lawn; without it, pet waste and rainwater have nowhere to go, leading to a breakdown of the tranquil environment you envisioned.
Start by diagnosing the “clog” to determine if the problem is the carpet or the ground. If water pools on the surface but the surrounding ground is dry, the turf backing itself may be non-permeable or the drainage holes may be blocked by fine debris. You can address this using the “puncture” method, which involves carefully adding small, strategic drainage holes through the backing to allow water to reach the sub-base. However, if the entire area feels spongy and takes hours to dry, the problem is likely a compacted or poorly graded sub-base. Deep cleaning the base to remove trapped bacteria and replacing standard silica sand with high-performance EverTurf Infill can dramatically improve airflow and liquid transit.
Fixing Standing Water
Low spots are the primary cause of pooling water and are almost always a result of improper sub-base compaction. These depressions occur when the ground settles unevenly, often because the installer failed to use a vibratory plate compactor or used the wrong type of aggregate. To fix this, you must peel back the turf in the affected area and add more crushed stone or decomposed granite to the sub-base. Level the material to match the surrounding grade and compact it thoroughly before re-securing the grass. For those managing yards with heavy pet use, the complete guide to artificial grass for dogs offers deeper insights into building a sub-base that handles high liquid volume without failing.
Eliminating Persistent Pet Odors
Standard sand infill is notorious for trapping ammonia from pet urine, leading to smells that won’t go away with simple rinsing. To reclaim your yard’s freshness, you must flush the system and replace the problematic ballast. Antimicrobial infill prevents bacteria from thriving, offering a long-term solution to odor prevention that standard products simply can’t match. Establish a regular flushing routine using a mixture of water and turf-safe enzymes to break down organic matter deep within the fibers and sub-base. By upgrading to professional-grade EverTurf Infill, you ensure your lawn remains a pristine, odor-free sanctuary for your entire family. This simple switch restores the restorative atmosphere of your property, moving you away from maintenance frustrations and back toward year-round enjoyment.
Repair vs. Replace: Making the Strategic Decision
Deciding whether to invest in restoration or opt for a complete replacement is a strategic choice that defines the future of your property. While learning how to fix bad artificial turf installation can rescue many lawns, you must first evaluate the age and condition of the material. If the fibers show signs of severe UV-degradation or feel brittle to the touch, the turf has likely reached the end of its functional life. In such cases, the structural stress of stretching or re-seaming may cause the backing to fail entirely; this makes a full replacement the more responsible long-term decision for your home.
Small burns from a fallen ember, localized tears from heavy furniture, or minor seam separations are excellent candidates for a targeted fix. You can often achieve an invisible repair by using “donor” turf from leftover remnants or hidden areas of the yard. The key to a successful patch is ensuring a perfect color match. Older installations may have faded slightly, so it is vital to check the pile height and grain direction of your donor piece before securing it with EverTurf Glue. These minor interventions restore the aesthetic harmony of your space without the need for a major construction project.
The Benefits of a Fresh Start with EverTurf
Starting over allows you to correct foundational errors that simple patches cannot touch. Upgrading to a high-performance EverTurf system ensures you are utilizing the latest innovations in drainage technology and heat-resistant fibers. This fresh start eliminates the underlying frustrations of a botched install, finally delivering the year-round tranquility you sought. For a detailed breakdown of what to expect when planning a new project, consult our artificial turf installation cost guide. Investing in quality materials and professional standards today protects your personal time and property value for the next decade.
Restore Your Outdoor Sanctuary
Reclaiming a botched landscape is about more than just aesthetics; it’s about restoring your personal time and the tranquility of your home. By understanding how to fix bad artificial turf installation, you can address unsightly wrinkles, failing seams, and persistent odors before they compromise your entire investment. Whether you’re performing surgical repairs with EverTurf Staples and Glue or optimizing drainage with specialized EverTurf Infill, the right materials are the foundation of a permanent, professional-grade solution.
As a national supplier of high-performance synthetic turf systems, we’re dedicated to helping you move away from the frustrations of poor installation toward a worry-free, year-round outdoor space. You deserve a lawn that remains lush and secure regardless of the local climate. Take the first step toward a more beautiful and stress-free version of your property. Upgrade your lawn with professional-grade EverTurf Artificial Grass and accessories today. Your perfect, low-maintenance sanctuary is well within reach.
Frequently Asked Questions
How do I fix a seam that is coming apart on my artificial grass?
Fix a failing seam by cutting back damaged edges to create a clean join and applying professional-grade EverTurf Glue to a fresh strip of seam tape. You must ensure the grain direction matches on both sides for an invisible finish. After pressing the edges into the adhesive, place heavy weights along the line for at least 24 hours. This surgical approach provides a weather-resistant bond that prevents the rolls from pulling apart.
Can I fix an uneven surface without removing the entire turf?
You can often correct localized unevenness by peeling back the turf in the affected area and adding more base material like crushed stone or decomposed granite. Once the low spot is filled, use a hand tamper or plate compactor to ensure the surface is level with the surrounding grade. This targeted method avoids the cost of a full excavation while restoring the smooth, tranquil appearance of your landscape without replacing everything.
Why does my artificial turf have wrinkles and how do I get rid of them?
Wrinkles typically form due to thermal expansion or insufficient stretching during the initial lay. To get rid of them, remove the infill with a shop vac and detach the turf from the nearest perimeter. Use a carpet kicker to stretch the material toward the anchors during the heat of the day when fibers are most pliable. Re-securing the edges with EverTurf Staples prevents the shifting that leads to future bubbling and ridges.
What is the best way to fix drainage problems in synthetic grass?
The most effective way to address standing water is to determine if the blockage is in the turf backing or the sub-base. If the backing is non-permeable, you can carefully puncture small drainage holes every few inches to allow transit. For deeper issues, replacing standard sand with EverTurf Infill improves airflow and liquid movement. This process is a key part of learning how to fix bad artificial turf installation that has become swampy.
Can I patch a hole in my artificial turf from a grill or fire pit?
Yes, you can patch localized damage by cutting out the affected square and replacing it with a donor piece of matching EverTurf Artificial grass. Use a sharp utility knife to ensure clean edges and secure the new piece using high-strength EverTurf Glue on a backing strip. Matching the grain direction is vital to ensure the patch remains invisible. This technique effectively rescues your investment from accidental burns or tears without requiring a full replacement.
How do I stop my artificial grass from smelling like dog urine?
Eliminate persistent odors by replacing standard silica sand with antimicrobial EverTurf Infill, which prevents ammonia-trapping bacteria from thriving. Establish a consistent flushing routine using water and turf-safe enzymatic cleaners to break down organic matter trapped in the fibers. This proactive maintenance restores the fresh, restorative atmosphere of your yard, ensuring it remains a safe and pleasant sanctuary for both your family and your pets throughout the entire year.
Is it worth fixing a 10-year-old artificial turf installation?
Deciding to repair a decade-old installation depends on the condition of the fibers and the backing. If the turf shows significant UV-degradation or feels brittle, the material may fail during the stretching or re-seaming process. Often, the labor costs for extensive repairs on aged turf are better spent on a fresh EverTurf installation. A new system provides updated technology and a better long-term return on your property value.
What tools do I need for a DIY artificial turf repair?
Successful DIY restoration requires a few specialized tools to achieve professional results. You’ll need a carpet kicker for stretching, a high-powered shop vac for infill removal, and a stiff-bristled power brush for fiber restoration. Essential supplies include EverTurf Staples and Glue for secure anchoring and a utility knife for precise cutting. Having these professional-grade components on hand ensures your repairs are durable and the final finish is indistinguishable from a new install.