
How to Properly Seam Artificial Turf Rolls for an Invisible Finish
What if the only way to tell your lawn isn’t natural was the fact that you never have to mow it? For many homeowners, the dream of a perfect outdoor sanctuary is often interrupted by the sight of a visible “mohawk” or a sunken valley running straight through the middle of their yard. You want a lush, uniform surface that feels like a single, continuous carpet, not a collection of mismatched pieces. It’s a common frustration to worry that your investment might pull apart or look amateurish after just one season of heavy foot traffic or play.
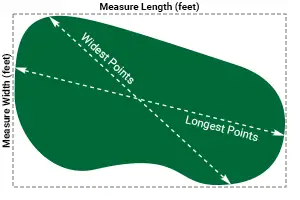
Learning how to properly seam artificial turf rolls is the definitive secret to transforming a DIY project into a professional-grade masterpiece. Since standard rolls are 15 feet wide, most residential landscapes require at least one seam to achieve full coverage. By mastering the precision geometry of turf gauges and following the 2024 Synthetic Turf Council guidelines, you can ensure your EverTurf installation remains flawless for years. This guide will walk you through the essential techniques for cutting with surgical accuracy, selecting the right high-performance adhesives, and securing your seams so they disappear completely into a beautiful, stress-free landscape.
Key Takeaways
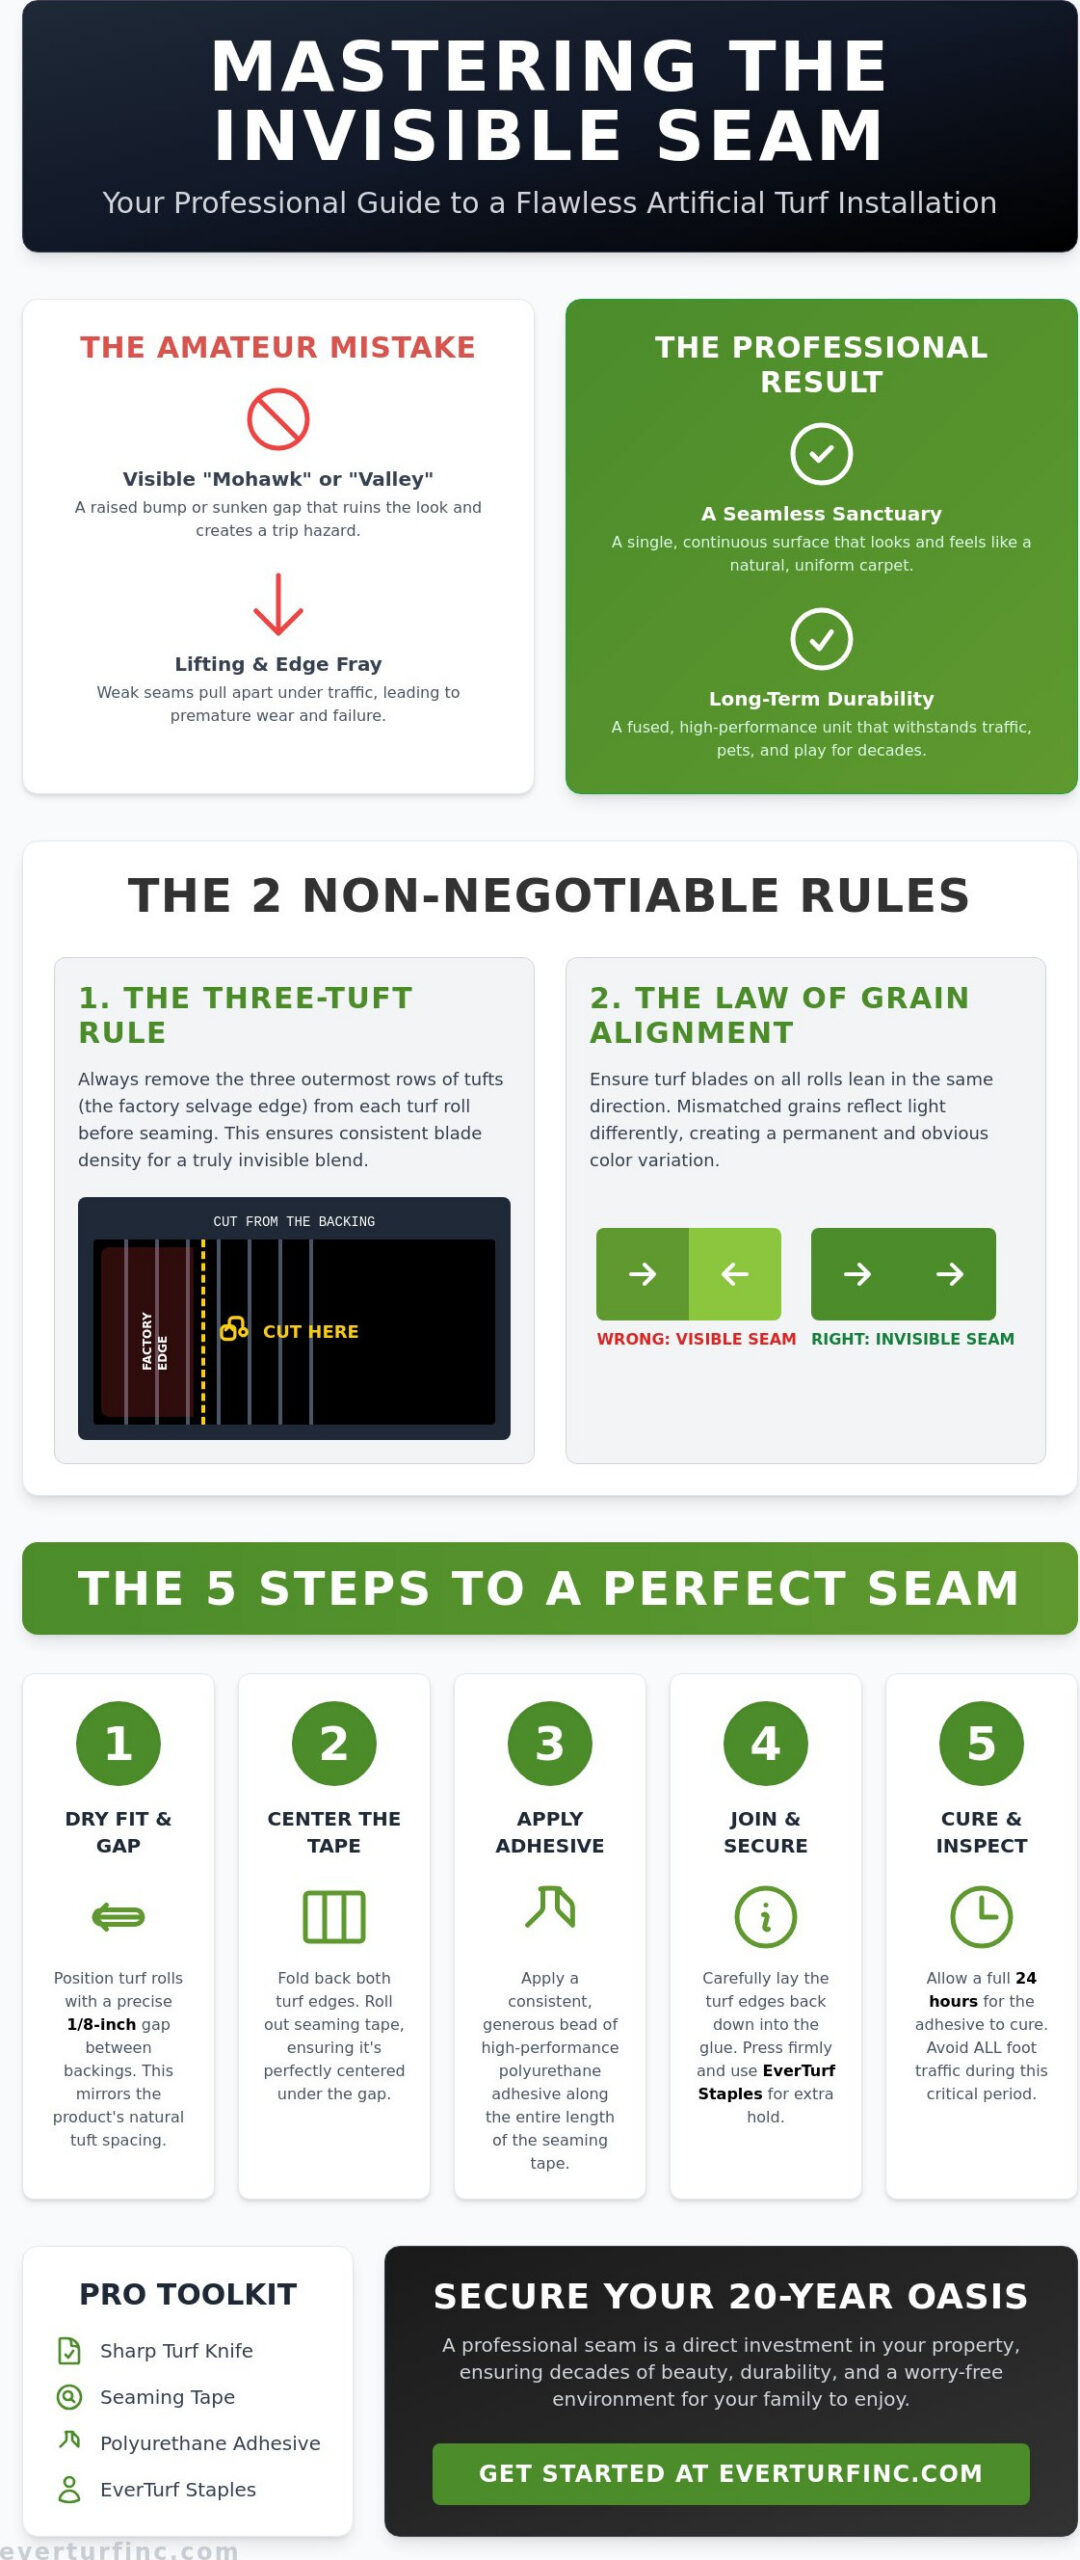
- Learn why removing the factory edge using the industry-standard Three-Tuft Rule is the non-negotiable first step for a truly invisible finish.
- Discover how to properly seam artificial turf rolls using high-performance polyurethane adhesives and EverTurf Staples and Glue to ensure your lawn withstands heavy traffic and pets.
- Master the Center Line technique to achieve perfect tape alignment and eliminate the visible “mohawk” or “valley” lines that plague amateur installations.
- Understand the critical 24-hour curing process and essential post-installation inspections that secure your synthetic sanctuary for the long term.
The Art and Science of an Invisible Turf Seam
Think of your synthetic lawn as a bespoke suit. The fabric is stunning, but the tailoring defines the final silhouette. In a synthetic landscape, the seam is the most critical structural point, acting as the bridge between two separate rolls. If executed poorly, it becomes a glaring distraction that interrupts the visual flow of your yard. If mastered, it creates a seamless sanctuary that looks as though it grew there naturally. Understanding how to properly seam artificial turf rolls is about more than just hiding a line; it’s about fusing two components into a single, high-performance unit that can withstand the test of time.
The “Invisible Seam” philosophy blends aesthetic perfection with structural durability. Every roll of EverTurf consists of a primary and secondary backing where rows of synthetic fibers are tufted in precise lines. These tuft lines are your roadmap. A perfect seam follows these lines with surgical precision, ensuring that the spacing between rolls matches the “gauge” of the product itself. This consistency prevents the dreaded “valley” or “mohawk” effect, protecting your investment from becoming a trip hazard while maintaining the lush, carpet-like aesthetic you desire for your property.
The Law of Grain Alignment
The most common reason for a visible seam isn’t a gap in the glue; it’s a mismatch in the grain. Every blade of grass on a turf roll leans slightly in one direction. If you place two rolls side-by-side with the grains facing different ways, the light will reflect off them differently. This creates a permanent color mismatch that no amount of brushing can fix. To avoid this, always follow the “Best View” rule. Angle the grain toward the primary viewing point, such as your back patio or living room window, to ensure the richest, most vibrant color. You can easily identify the grain direction on EverTurf products by performing a “hand sweep” test. Simply slide your hand across the blades; the direction that offers the least resistance is the way the grain is leaning.
Seaming for Longevity and ROI
Precision seaming is a direct investment in your property’s value. When you consider the total artificial turf installation cost, the integrity of the bond is what ensures that cost is amortized over decades rather than years. High-traffic areas, especially those frequented by pets or active children, put immense shear pressure on these joints. A professional-grade seam prevents edge-fray and “lifting,” which are the primary causes of premature wear. By approaching your installation with the mindset of a Reliable Visionary, you aren’t just laying grass. You are engineering a 20-year outdoor oasis that restores your personal time and provides a worry-free environment for your family to enjoy.
Essential Preparation: The Three-Tuft Rule and Factory Edges
Preparation is the silent architect of a flawless landscape. Before you ever reach for the adhesive, you must address the factory edge of your turf. These edges are often compressed or slightly distorted during the manufacturing and shipping process, meaning you can never achieve a professional finish by seaming them “out of the box.” To master how to properly seam artificial turf rolls, you must create a new, perfectly straight edge that reveals the true density of the fibers. This process requires patience, but it’s the difference between a visible DIY project and a sophisticated outdoor sanctuary.
The Three-Tuft Rule stands as the industry gold standard for a reason. By removing exactly three rows of blades from the edge of each roll, you discard the unstable selvage and reach the uniform tufting of the turf’s core. This ensures that when the two rolls meet, the blade density is consistent across the entire surface. You’ll need a sharp carpet knife or a specialized turf cutter to maintain this precision. Success depends on the “Gauge” factor, which is the specific distance between rows of tufts. Your goal is to mirror this distance exactly at the seam line so the eye cannot detect where one roll ends and the next begins.
Executing the Perfect Relief Cut
Flip the turf over and always cut from the backing side. This technique protects the synthetic fibers, ensuring you don’t accidentally shear the very blades you’re trying to blend. Follow the space between the tuft lines with a steady hand, staying a consistent distance from the nearest row. A dull blade is the biggest risk to a clean seam because it tears through the rugged backing rather than slicing it, leading to jagged edges that refuse to sit flush.
The Dry Fit: Testing for Mohawks and Valleys
Never apply glue until you’ve performed a comprehensive dry fit. Aim for a 1/8-inch gap between the backings of the two rolls. This tiny space is the “sweet spot” that allows the blades to stand upright without crowding. If you push the rolls too close together, you create a “Mohawk,” a visible ridge where the blades are forced upward. Conversely, a gap that is too wide creates a “Valley,” a distracting line that reveals the backing below. For homeowners seeking an effortless result, professional artificial grass installation ensures these technical nuances are handled with expert care.
Choosing Your Bond: Glue and Tape vs. Self-Adhesive Systems
Selecting the right bond is where structural engineering meets aesthetic vision. To master how to properly seam artificial turf rolls, you must look beyond the surface and consider the molecular connection holding your landscape together. For a permanent, high-performance backyard turf, polyurethane adhesives are the undisputed choice. Unlike standard glues, these professional-grade formulas create a flexible yet unbreakable connection that moves with the earth rather than cracking under the pressure of seasonal changes.
While self-adhesive seam tapes offer a convenient solution for low-traffic areas or small repairs, they often lack the long-term shear strength required for family play zones or pet areas. When deciding how to properly seam artificial turf rolls in regions with high temperature fluctuations, the choice of adhesive becomes even more critical. Industry professionals typically utilize 12-inch wide seam tape paired with a moisture-cured turf glue for a result that lasts decades. One gallon of high-quality adhesive typically covers approximately 100 feet of 12-inch seam tape, providing a generous and secure bonding area that ensures your investment remains a stable, beautiful sanctuary.
Adhesive Chemistry for the Homeowner
Successful seaming requires an understanding of “open time” and “cure time.” Open time refers to the window you have to reposition the turf once it touches the glue, while cure time is the duration needed for the bond to reach full strength. In many US climates, moisture-cured adhesives are the gold standard because they utilize ambient humidity to trigger the hardening process. This makes them exceptionally resilient against rain and groundwater. Always prioritize safety by working in well-ventilated areas and wearing protective gloves to prevent skin contact with high-performance chemicals.
Mechanical Fasteners as a Secondary Defense
Think of EverTurf Staples as the internal skeleton of your seam. Strategic placement of these fasteners alongside your adhesive prevents the turf from shifting during extreme temperature swings, which can cause synthetic materials to expand or contract. This is particularly vital when seaming specialized surfaces like EverTurf Putting Green Pro. On a putting surface, even a millimeter of movement can disrupt the ball’s path, making the combination of mechanical and chemical bonds essential for professional-grade backyard golf. Using a high-quality adhesive can provide a bond significantly stronger than fasteners alone, creating a redundant system that ensures your seams never pull apart.
Step-by-Step Guide to Executing a Professional-Grade Seam
Execution is where your meticulous preparation meets its reward. To understand how to properly seam artificial turf rolls, you must approach the physical act of bonding with a steady hand and an eye for detail. Begin by ensuring the backing of your turf is completely free of dust, loose sand, or debris. A simple wipe with a damp cloth can prevent microscopic particles from compromising the adhesive’s integrity. Once cleaned, use the “Center Line” technique by marking the exact middle of your seam path directly onto the sub-base with chalk. This line serves as your guide, ensuring your 12-inch seam tape remains perfectly centered under the two meeting edges.
Folding the turf back requires the “Zipper” method to protect the fibers. Gently peel back each side about 12 inches and secure them with weights to prevent them from flopping back prematurely. This creates a clear workspace for your adhesive. Apply your moisture-cured glue using a 3/16-inch notched trowel, which ensures even distribution across the tape. As you bring the edges back together, work in small sections, carefully “zipping” the blades together to ensure no green fibers are trapped in the glue. Finally, place a weighted board or seam roller over the joint to ensure a flush, uniform finish that bonds the backing deep into the adhesive.
Managing the “Glue Line”
Precision is vital when applying adhesive to your 12-inch seam tape. You should apply glue only to the center 6 inches of the tape, leaving a 3-inch buffer on either side. This prevents “over-gluing,” a common error where excess adhesive bleeds through the backing and onto the visible blades. Your working pace should reflect the 2026 weather forecast; on humid days, the adhesive will cure faster, requiring you to move with more purpose to secure the bond before it skins over. If the technical demands feel overwhelming, you can always reach out to experts for artificial turf installation near me to ensure a flawless result.
The Final Grooming
Once the adhesive has reached its initial set, it’s time to blend the two rolls into one. Use a power brush or a stiff-bristled broom to stand the blades upright, encouraging them to intermingle across the seam line. The application of turf infill acts as the final vanishing act, providing the necessary weight to keep fibers upright and hiding any remaining traces of the joint. Watching the visible line completely disappear under your first brushing is a moment of pure satisfaction, marking the transition from a construction site to a professional-grade sanctuary.
Beyond the Bond: Securing Your Investment with EverTurf
Your masterpiece is now taking shape, but the final stage of learning how to properly seam artificial turf rolls involves patience and vigilance. The first 24 hours after application are the most critical. During this window, the moisture-cured adhesive undergoes a chemical transformation, reaching its full structural integrity. Avoid walking on the seams or allowing pets to play in the area until the bond has completely set. Once this period passes, conduct a thorough “pull test” by gently tugging at the fibers near the joint. A successful seam will feel like a single, solid piece of material, showing no signs of lifting or separation.
EverTurf’s proprietary backing technology is specifically engineered to provide a high-grip surface that facilitates a superior bond. While traditional latex backings can sometimes resist adhesives, our advanced secondary backing allows the glue to penetrate deeper into the structure. This creates a permanent fusion that resists the expansion and contraction common in fluctuating climates. By choosing the right materials, you aren’t just hiding a line; you’re ensuring your synthetic lawn remains a beautiful, long-term sanctuary that looks as vibrant in year ten as it did on day one.
Seam Care for Pet Owners
For those who have installed artificial grass for dogs, the seam serves as a vital barrier. A fully sealed seam prevents urine from infiltrating the sub-base at the most vulnerable points of the installation. We recommend a regular cleaning protocol that includes rinsing the seam areas with a pet-safe enzymatic cleaner to maintain a fresh environment. Using EverTurf Infill is the perfect partner for a seamed pet lawn, as it provides the necessary weight to keep the edges pressed firmly against the tape while offering antimicrobial protection for your furry friends.
Professional Support and Accessories
You don’t have to embark on this journey alone. Whether you’re looking for EverTurf Staples, high-performance Glue, or specialized seam tape, having the right professional-grade accessories is the only way to guarantee an invisible finish. Our “Reliable Visionaries” are always available to consult on complex landscape designs or unique drainage challenges. Mastering how to properly seam artificial turf rolls is a rewarding skill that restores your personal time and elevates your property’s value. When you’re ready to move away from the frustrations of traditional maintenance, we are here to help you achieve the tranquility of a perfect outdoor space.
Transform your landscape with EverTurf Artificial Grass and start enjoying your worry-free sanctuary today.
Embrace Your Everlasting Outdoor Sanctuary
Mastering how to properly seam artificial turf rolls is the final bridge between a simple renovation and a total lifestyle transformation. By respecting the law of grain alignment and strictly adhering to the Three-Tuft Rule, you’ve ensured your lawn possesses the structural integrity of a professional installation. These precise techniques, combined with our professional-grade polyurethane adhesives, create a bond that defies the elements and provides a seamless, carpet-like finish for years to come.
Our proprietary backing technology is specifically designed to facilitate these superior bonds, ensuring your investment remains a stable and beautiful retreat for your family. With national distribution available for fast project starts, the tranquility of a maintenance-free yard is closer than ever. You deserve a property that restores your personal time and offers a lush, year-round escape from the demands of traditional lawn care. It’s time to trade your mower for a sanctuary that stays perfect regardless of the season.
Take the next step toward your perfect landscape today. Browse EverTurf Installation Accessories and Premium Grass Rolls to find everything you need for a flawless, invisible finish. Your vision of a stress-free, beautiful home is ready to become a reality.
Frequently Asked Questions
How long does it take for artificial turf glue to dry completely?
Most professional-grade polyurethane adhesives require a full 24 hours to cure completely. While the seam may feel secure to the touch within a few hours, you should avoid heavy foot traffic or pet play during this entire window. Extreme humidity or cold temperatures can sometimes extend this timeframe, so it’s best to check the manufacturer’s specific instructions for your local climate.
Can I seam artificial turf in the rain or on a damp sub-base?
You should never attempt to seam turf during active rainfall or on a saturated sub-base. Moisture trapped between the seam tape and the backing can cause the adhesive to fail or prevent it from bonding correctly. If your project area is damp, wait for a dry window and ensure all materials are completely moisture-free before applying any glue to ensure a permanent result.
What happens if I get glue on the grass blades during installation?
If you accidentally get adhesive on the synthetic blades, act quickly to remove it using a clean cloth and a small amount of mineral spirits. Be careful not to over-saturate the area, as excessive chemicals can damage the turf backing. If the glue has already dried, you might need to carefully trim the affected fibers with sharp scissors to maintain the lawn’s uniform aesthetic.
How many staples do I need to reinforce a 20-foot seam?
For a 20-foot seam, you should place staples approximately every 6 inches along the joint to provide maximum reinforcement. This equates to roughly 40 staples per side of the seam for a secure hold. Using this mechanical support alongside your adhesive ensures the rolls won’t shift during the expansion and contraction cycles caused by seasonal temperature changes.
Is it possible to repair a seam that has started to pull apart?
You can repair a failing seam by carefully peeling back the loose edges and removing old adhesive or debris from the area. Once the backing is clean and dry, apply a fresh layer of moisture-cured glue and new seam tape. Learning how to properly seam artificial turf rolls during the repair process will prevent the issue from recurring and restore the tranquil beauty of your landscape.
Do I need different seam tape for a putting green versus a pet lawn?
The standard 12-inch white seam tape is appropriate for both applications, but the installation priorities differ slightly. Pet lawns require a fully non-porous bond to prevent liquid infiltration, whereas putting greens prioritize a perfectly flat, low-profile seam for consistent ball roll. Both scenarios benefit from the structural stability provided by high-quality polyurethane bonds and proper infill application.
How do I seam artificial turf around a curved garden bed or tree?
To seam around curves, use a series of small relief cuts on the backing to allow the turf to follow the contour of the garden bed or tree. Secure these intricate areas with additional staples and adhesive to prevent the edges from lifting over time. This precision work ensures a sophisticated, custom-fit look that enhances the natural flow of your property’s unique landscape features.
Will the seam be visible to the naked eye if I follow these steps?
When you master how to properly seam artificial turf rolls using the Three-Tuft Rule and proper grain alignment, the joint should be virtually undetectable. The combination of precision cutting, correct 1/8-inch blade spacing, and thorough power brushing blends the fibers into a single, continuous surface. Your result will be a professional-grade sanctuary that looks like a natural, uninterrupted carpet of green.