



How to Fix Poor Drainage Under Existing Turf
The first fix for a soggy turf area may be to leave the turf in place. Lifting it before you know where water is getting trapped can turn a small repair into a larger one. If you’re searching for how to fix poor drainage under existing turf, start by tracing where the water comes from, where it collects, and whether the issue is at the surface, in the base, or below it.
Standing water can make a yard frustrating to use, especially when it returns after every rainfall. It’s not always obvious whether the turf system or the soil beneath it is to blame. A careful diagnosis helps you choose a repair that fits the problem instead of disturbing more of the yard than necessary.
This guide explains how to spot likely failure points, distinguish a localized puddle from a broader drainage issue, and choose a proportionate repair before lifting or rebuilding turf. You’ll also learn what to consider when replacing system components, so the finished surface sits neatly and is less likely to hold water again.
Key Takeaways
- Puddles, soft spots, and slow-drying patches can point to drainage trouble, but they don’t reveal which layer is failing.
- Track where and when water collects, how long it lingers, and whether nearby outlets or edges show signs of blockage.
- Learn how to fix poor drainage under existing turf by matching the repair to the likely cause, from surface cleanup to a targeted repair or broader base work.
- Limit disruption by defining the repair area before lifting turf, then follow the installation system’s guidance for handling and restoring it.
- Check for recurring puddles or soft areas after the repair, and replace turf components only when inspection shows they’re needed.
Poor Drainage Under Existing Turf: Recognize the Symptoms Before Repair
Puddles after rain, patches that stay damp, soft spots underfoot, or water appearing at the turf’s edges can all signal a drainage concern. These clues don’t tell you which part of the system is responsible. A wet surface may point to debris or a low area, while water that lingers beneath the turf may involve the base, underlying soil, or a drainage route.
Standing water is the visible symptom; the drainage failure is the point where water stops moving as it should. Keep that distinction in mind before lifting turf. To understand how water moves and collects, see Understanding Drainage.
An artificial turf system includes the turf surface and backing, an aggregate base beneath it, and the underlying soil or a route that carries water away. A problem in any one of these layers can affect the whole surface. Isolated pooling after an unusually heavy downpour may behave differently from ponding that returns during ordinary wet conditions, so note the circumstances as well as the puddle itself.
What does poor drainage under artificial turf look like?
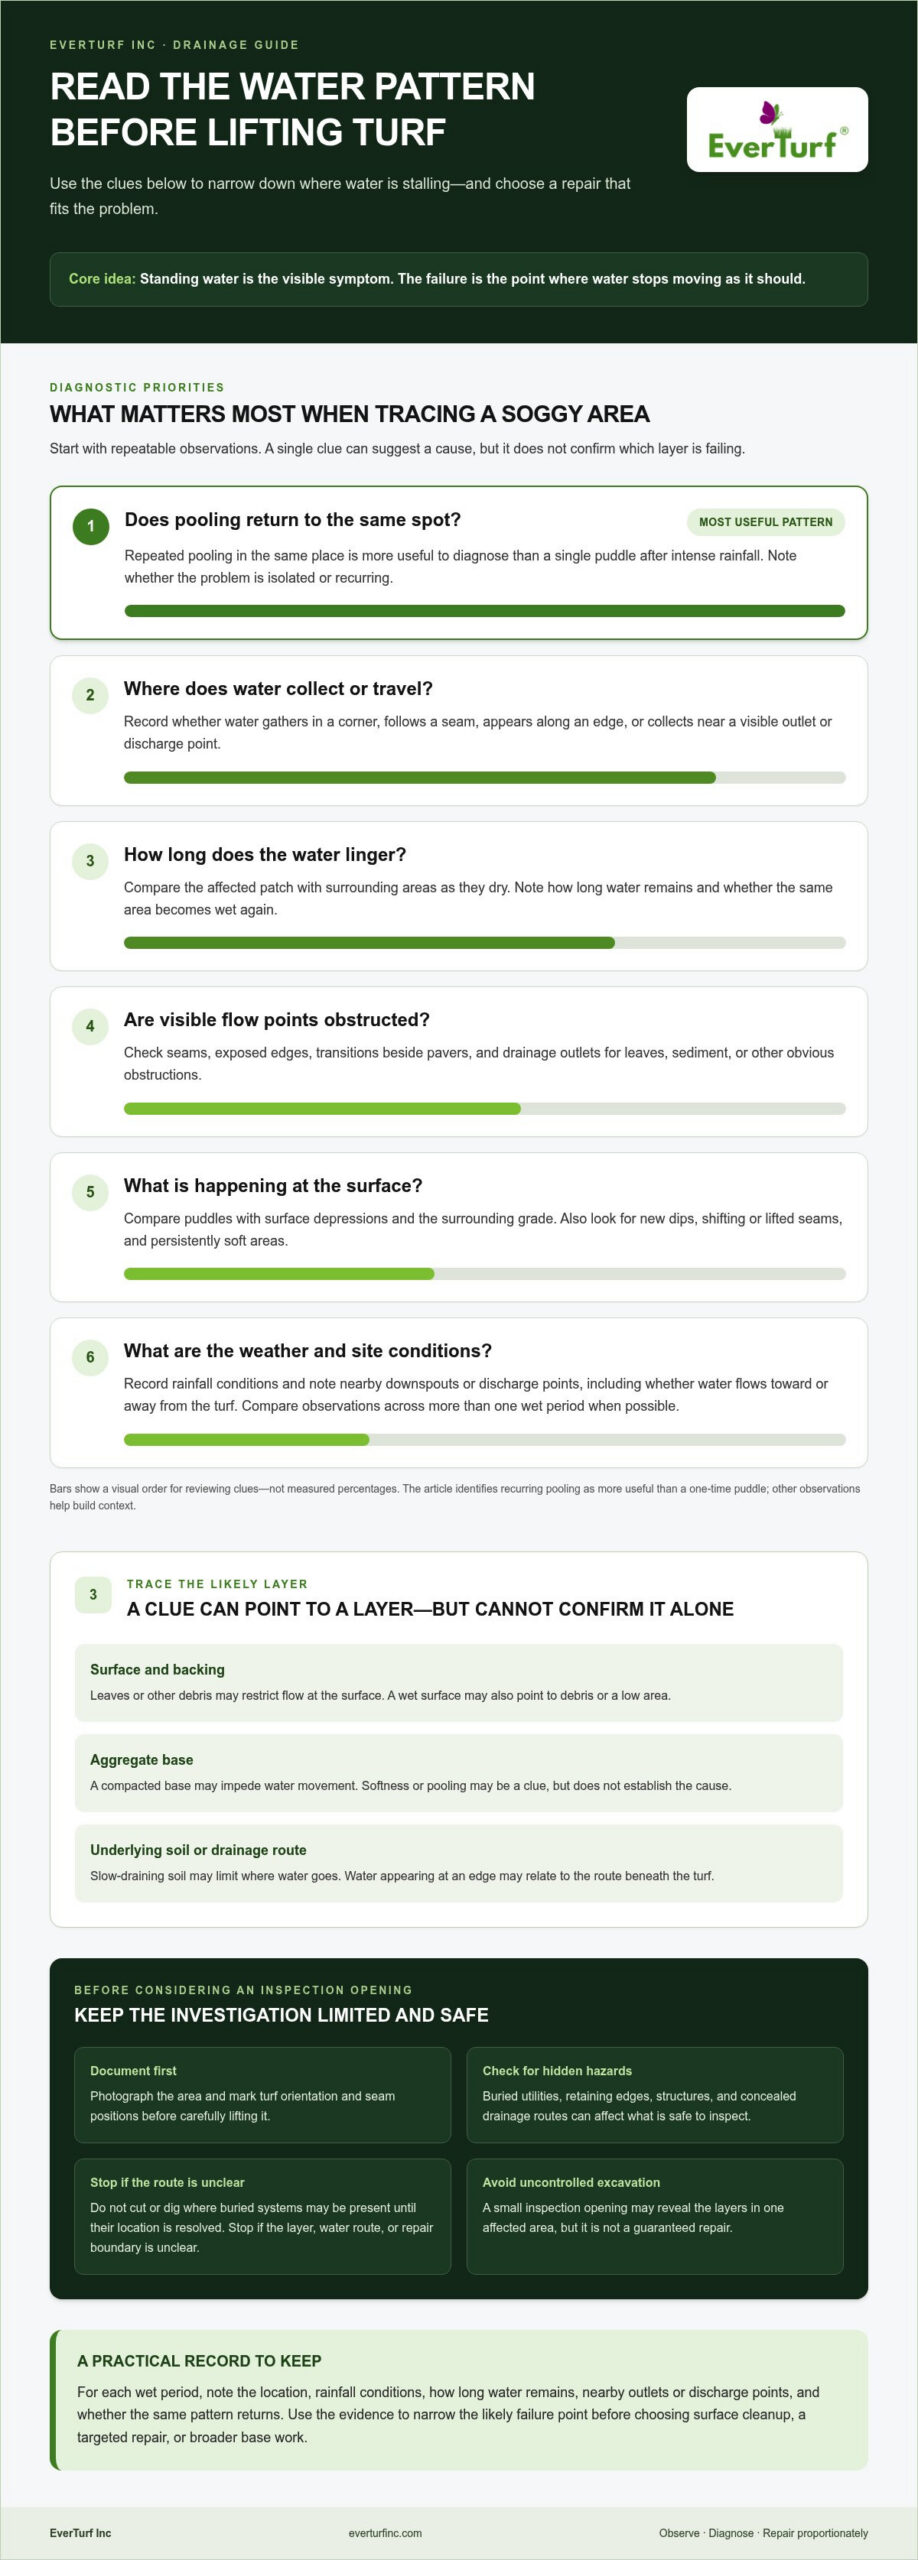
Look for patterns. Does water collect in one corner, follow a seam, or appear along an edge? Does it clear as the surface dries, or remain after surrounding areas are dry? Repeated pooling in the same spot is more useful to diagnose than a single puddle after intense rainfall.
Also watch for new depressions, seams that shift or lift, and areas that feel persistently soft. Before moving anything, record the location, weather conditions, and how long the water remains. Photos taken from the same viewpoint after different rain events can show whether the pattern is isolated or recurring.
Is the problem in the turf, the base, or the soil?
Water can pass through a turf surface and backing yet still drain slowly below them. Leaves or other debris may restrict flow at the surface; a compacted aggregate base may impede movement; and a low spot can hold water even when nearby areas drain. Slow-draining soil may also limit where water can go once it reaches the bottom of the system.
These are possibilities, not a diagnosis. Water emerging at an edge could relate to the route beneath the turf, while a soft area might indicate a low spot or a problem deeper in the base. Neither clue confirms the cause on its own. If you’re considering how to fix poor drainage under existing turf, record what you observe and where it happens. That evidence helps narrow the likely failure point before deciding whether to disturb the surface.
How to Diagnose the Drainage Failure Beneath Existing Turf
Before choosing a repair, build a clear picture of where water travels and where it stalls. Repeated observations can help distinguish a blocked surface or outlet from a low area, a compacted base, or slow-draining soil. Diagnose the drainage path before removing turf or adding materials, so the repair addresses the cause instead of hiding the symptom.
Which checks can you make without lifting the turf?
Start with what you can see. Note the rainfall conditions, where pooling starts, how long it lasts, and whether the same area becomes wet again. Check visible seams, exposed edges, transitions beside pavers, and drainage outlets for leaves, sediment, or other obvious obstructions. Compare puddles with surface depressions and the surrounding grade, while remembering that appearance alone can’t confirm what’s happening below.
Keep a simple record over more than one wet period when possible. Include nearby downspouts or other discharge points, and note whether water flows toward or away from the turf. A puddle that clears while water repeatedly gathers at an outlet may point to a different issue from ponding that stays concentrated in a surface hollow. Don’t pour water into an outlet or alter a drainage connection as a test unless you know it’s safe and appropriate for that system.
When does a small inspection opening make sense?
A limited opening may help reveal whether the layers immediately beneath one affected area appear disturbed, but it’s an inspection, not a guaranteed repair. Consider it only when the location is understood and the work can be done safely. Before carefully lifting the turf, photograph the area and mark its orientation and seam positions so the original layout is clear during reinstatement.
Site conditions matter. Buried utilities, retaining edges, nearby structures, and concealed drainage routes can change what’s safe to inspect. Don’t cut or dig where buried systems may be present without first resolving their location. Stop if the opening exposes an unclear layer, water route, or repair boundary. A small inspection should not become an uncontrolled excavation.
Use your observations to narrow the likely failure point, not to declare it. A visible obstruction at an outlet is a useful clue, but water collecting elsewhere may still involve the base or soil. Likewise, a dip in the surface could reflect a low spot below the turf, but inspection is needed to understand its extent. This measured approach helps you decide how to fix poor drainage under existing turf without lifting more than necessary.
Once you’ve documented the pattern, compare it with the turf system and materials involved. EverTurf’s artificial turf options can help you choose compatible replacement materials if inspection shows the surface needs attention. The underlying drainage issue still requires its own diagnosis.
Choose the Right Fix: Surface Cleanup, Local Repair, or Base Rebuild
Once you’ve narrowed down where water is being held, match the repair to the likely cause. Clearing debris won’t correct a settled base, and rebuilding a large area may be unnecessary if one accessible outlet is blocked. Use the table as a starting point, then adjust the scope to what inspection reveals.
| Likely issue | Proportionate response | Signs the problem may be broader |
|---|---|---|
| Debris on the surface or at an accessible outlet | Remove the obstruction and observe how water behaves afterward. | Pooling continues away from the cleared spot or returns in multiple areas. |
| A localized depression or isolated soft area | Assess and correct the affected area, exposing only what’s needed to understand the layers. | Nearby areas are also soft, uneven, or repeatedly ponded. |
| Recurring ponding across a wider area or a compromised base | Reassess the system and consider lifting turf to address the underlying condition. | Water remains in several locations or the base and exit route appear to be failing. |
When can cleaning or a localized correction help?
Surface cleanup is appropriate when debris is visibly blocking the area and water flow improves after it’s removed. If inspection points to an accessible outlet obstruction, clearing it may also help. For a single low spot, a focused correction may be enough, but first establish what has settled beneath the turf. Don’t add infill or other material blindly. It can hide a depression without correcting it.
Infill has a role within a turf system, but it isn’t a universal drainage fix. Adding more won’t repair a compacted or failed base, change the grade, or create a route for water to leave. For background on its purpose and use, consult The Essential Guide to Turf Infill, and follow the instructions for the specific turf system when selecting or replacing infill.
When might turf need lifting and the base rebuilt?
Recurring ponding across a wider area, persistent soft spots, or inspection that reveals damaged or uneven underlying layers can signal that a surface-only fix won’t be enough. A rebuild may involve correcting the base condition, addressing the slope, and establishing an effective water exit route. The right scope depends on the confirmed cause and site conditions, not a standard depth or gradient applied to every yard.
Likewise, opening an outlet can’t solve every subsurface problem. If water still collects after an obstruction is cleared, or the same symptoms appear in separate areas, reassess the broader drainage path before adding materials. The best way to decide how to fix poor drainage under existing turf is to connect each proposed repair to evidence from the affected area. Replace or adjust turf components only when inspection shows they’re part of the problem. Artificial turf alone can’t correct a failed base or slow-draining soil.
How to Repair Poor Drainage Under Existing Turf Step by Step
A lasting repair starts with the cause, not the shovel. Use your observation notes to decide whether the issue is confined to a surface obstruction, a small settled area, or a wider failure beneath the turf. If the cause or safe work area is unclear, pause before cutting or digging. Buried utilities and concealed drainage routes can make even a small opening risky.
- Document the symptoms. Record where water gathers, how long it stays, and the conditions when it appears. Take photos and mark affected areas so you can compare the result later.
- Identify the likely cause. Check visible edges, seams, outlets, and surface levels first. Use those clues to determine what needs closer inspection instead of assuming the turf itself is at fault.
- Set the repair boundary. Define the smallest area that lets you inspect and address the suspected issue. Expand the scope only if what you uncover shows the problem extends farther.
- Expose and correct the affected layer. Lift only the needed section, then address the confirmed cause. This may mean clearing an obstruction or correcting an affected base area and its route for water to move away. The exact work depends on the existing system and site conditions.
- Restore and check the surface. Relay and secure the turf, then finish seams and edges using compatible materials and the installation system’s instructions.
How do you lift and preserve turf for a localized repair?
Before lifting, photograph the surface and mark the turf’s direction, seam positions, and the limits of the affected area. Follow the installation system’s guidance for loosening and storing the turf so you don’t stretch, crease, or damage it. Keep the opening focused. Avoid forceful cutting or digging where utilities or concealed drainage may be present, and stop if the safe repair boundary isn’t clear.
Once exposed, inspect before changing materials. Correct only the layer shown to be contributing to the problem, and restore a suitable path for water to leave the area without assuming a particular base depth or slope applies everywhere. A replacement section of artificial turf, infill, staples, or glue should be compatible with the existing system and used only where inspection shows it’s needed. New turf materials can finish a repair, but they can’t correct poorly draining soil or a failed base by themselves.
How do you check the repair before calling the job done?
Check that the repaired area has stable, even support and that seams, edges, and transitions sit neatly without gaps, lifting, or new depressions. Judge the repair by how water moves under comparable wet conditions, then monitor the original problem spots for returning pooling. Compare the result with your initial notes. One dry-day inspection can’t show how the area performs in rain.
If you’re planning a repair that also needs compatible turf materials, explore EverTurf artificial turf options as part of restoring a clean, usable surface.
Keep Repaired Turf Draining: Materials, Maintenance, and Next Steps
A repair is only part of the solution. A few simple checks can help you spot returning drainage trouble early, before a damp patch becomes a larger disruption. Keep an eye on the areas that pooled before, especially after rain, and compare what you see with your original notes. Changes in where water gathers or how long it lingers can help show whether the repair is holding or the underlying issue needs another look.
What should you monitor after fixing turf drainage?
After suitable wet weather, revisit the repaired area and check how water moves and whether the surface dries in a pattern similar to nearby turf. Clear leaves and other debris from accessible edges, seams, transitions, and outlets so visible drainage paths stay open. Look for new depressions, returning puddles, loose edges, or soft spots underfoot. If a symptom returns, reassess its cause rather than simply adding material to the surface.
Keep the routine practical. A quick visual check while tidying the yard can reveal whether an outlet is obstructed or a familiar low area is holding water again. Persistent or widespread ponding, or soft areas that keep returning, may point to a deeper condition in the base, soil, or water exit route. In that case, a fuller inspection and repair may be more appropriate than repeated surface adjustments.
How should replacement materials fit into a drainage repair?
Choose replacement turf and components to suit the existing system and the area being repaired. If inspection shows that the turf itself is damaged, a compatible replacement section may be needed. If infill needs attention, treat it as one component of the turf system, not a substitute for correcting a low spot, failed base, or poorly draining soil. Staples, glue, and other installation accessories should also match the repair method and system instructions.
EverTurf supplies artificial turf, infill, and installation accessories for projects where replacement components are appropriate. Use them as part of a diagnosis-led repair, not as a stand-alone answer to a subsurface drainage problem. For a broader overview of system and material considerations, The Ultimate Guide to Artificial Grass can provide useful context as you plan.
Keep comparing the repaired area with its original symptoms. If water continues to collect across multiple locations, or soft spots and depressions return, revisit the repair scope and investigate the underlying drainage path. Knowing how to fix poor drainage under existing turf starts with identifying the failing layer, and follow-up observations help you confirm whether the chosen correction addressed it.
If you’re planning a turf repair or replacement, explore EverTurf turf and installation components to find materials suited to the work identified by your inspection.
Make Your Next Turf Decision With Confidence
A drainage repair is an opportunity to make your outdoor space more dependable, not just to hide a puddle. Use what you’ve observed to guide the next decision: whether the existing surface can stay in place, a localized area needs attention, or a wider repair is warranted. Keeping the diagnosis at the center helps you avoid replacing materials that aren’t part of the problem.
For a planned repair or replacement, choose turf and components that suit the existing system and the way you use the space. EverTurf supplies synthetic turf for residential, commercial, and athletic settings, along with infill and installation accessories for relevant projects. These materials can support a well-considered repair, while the underlying base and water route still need to be addressed on their own.
With a clear understanding of how to fix poor drainage under existing turf, you can take the next step without guessing. Explore EverTurf artificial grass and turf components to plan a surface that’s ready for everyday use.
Frequently Asked Questions
Why is water pooling on my artificial turf after rain?
Water may be collecting because runoff flows toward a low area, an outlet is obstructed, or water can’t move efficiently through the layers below the turf. The pattern offers clues: pooling beside a roof downspout may relate to concentrated runoff, while water appearing along a border may point to a different route. Note what feeds the puddle as well as where it forms.
Can you fix poor drainage under turf without removing all of it?
Yes, some problems can be addressed without removing the entire turf surface, especially if inspection confirms that the issue is limited to one accessible spot or outlet. The repair area depends on what’s affected. A small opening may be enough to investigate a localized concern, while symptoms across several areas can indicate that a broader section needs attention. Avoid expanding the opening until the cause and repair boundary are clearer.
How do you find the cause of drainage problems under artificial grass?
Start by tracking the conditions around each occurrence: rainfall, where water first appears, and whether nearby roofs, hard surfaces, or outlets direct water toward the turf. Compare notes from separate rain events to see if pooling follows the same pattern. Surface observations can narrow the possibilities, but they can’t confirm the condition of hidden layers. If the evidence remains unclear, a careful inspection may be needed before selecting a repair.
Will adding more infill fix poor drainage under artificial turf?
Usually, adding infill alone won’t resolve a drainage problem caused by a low spot, compacted base, or slow-draining soil. Infill is a component of the turf system, not a replacement for correcting the layer that’s holding water. Adding it without identifying the cause may leave the puddle unchanged and make it harder to assess the surface. Use compatible infill only when the system’s condition and instructions call for it.
Do you need to lift artificial turf to repair drainage underneath?
Not always. If the cause is visible debris or an accessible obstruction, lifting turf may be unnecessary. A hidden issue beneath the surface can require a limited opening so the affected layer can be inspected and corrected. Before disturbing the turf, consider concealed utilities and drainage routes, and record seam positions and turf direction. The inspection findings should determine whether a small section or a larger area needs to be lifted.
How can you tell if turf drainage has been repaired?
Compare how the repaired spot behaves during similar wet conditions with your notes from before the work. Check whether water still collects in the same place, whether it spreads into a new area, and whether soft spots or depressions return. There’s no single drying-time threshold that applies to every turf system and site. Keep observing after later rainfall, since one event may not reveal a recurring problem.
Can artificial turf drain if the soil underneath drains slowly?
Water may pass through the turf system but still collect if the soil below absorbs it slowly and there’s no suitable route for it to move away. Turf doesn’t change the soil’s drainage characteristics. Whether the surface drains acceptably depends on the full system and site conditions, including how water exits the area. If ponding persists despite a clear turf surface, investigate the underlying soil and drainage path rather than relying on turf or infill alone.