


Install a Backyard Putting Green: Professional Guide
What if your backyard could do more than just look green and actually shave three strokes off your short game before your next tee time? Many golf enthusiasts hesitate to start this project because they fear a bumpy surface, poor drainage, or visible seams that ruin the aesthetic of their home. You deserve a sophisticated practice space that offers a true roll without the constant headache of traditional lawn maintenance. Understanding how to install a backyard putting green correctly is the difference between a frustrating DIY project and a high-end lifestyle investment that increases your property value.
We’ve designed this guide to help you master the professional installation process from the ground up. You’ll learn how to sculpt a durable sub-base that prevents waterlogging and how to utilize premium materials like EverTurf Putting Green Pro for a tournament-quality finish. We will cover everything from precise seam bonding with specialized staples and glue to the final application of infill for perfect ball speed. By the end, you’ll have the roadmap to transform your outdoor space into a tranquil, low-maintenance retreat that’s ready for play in any season.
Key Takeaways
- Select the perfect location by balancing natural drainage and visibility to turn your backyard into a sophisticated, year-round practice retreat.
- Learn the professional steps of how to install a backyard putting green, focusing on a deep excavation and a stable sub-base for a permanent, bump-free surface.
- Discover the importance of turf acclimation and grain alignment using EverTurf Putting Green Pro to ensure your practice surface looks as good as it plays.
- Perfect your stimp speed and ball roll through the precise application of EverTurf Infill and professional brushing techniques.
- Protect your investment and property value with expert maintenance tips that keep your green performing at a pro-grade level with minimal effort.
Designing Your Private Oasis: Site Selection and Planning
Designing a professional-grade green begins long before the first shovel hits the dirt. It’s about envisioning a space that complements your lifestyle and elevates your property’s character. When you begin researching how to install a backyard putting green, you’ll find that success is rooted in the precision of your initial plan. Start by selecting a location that offers high visibility from your favorite indoor or outdoor seating areas. This ensures you can enjoy the aesthetic beauty of your investment even when you aren’t practicing your short game.
When planning the layout, consider how structural elements like custom paver patios or retaining walls from 405 Outdoor Living can complement the green, helping to create a cohesive and functional outdoor retreat.
Consider the natural environment. While synthetic turf doesn’t require sunlight to thrive, your surrounding landscape does. Avoid placing your green directly under heavy-fruiting trees or in areas where water naturally pools after a storm. You also need to decide on the “stimp” or speed of the roll. A pro-grade green should mimic the fast, true surfaces found on elite courses. Unlike traditional types of putting green grasses that require daily mowing and expensive chemicals to maintain speed, EverTurf Putting Green Pro delivers that tournament-level consistency year-round without the labor.
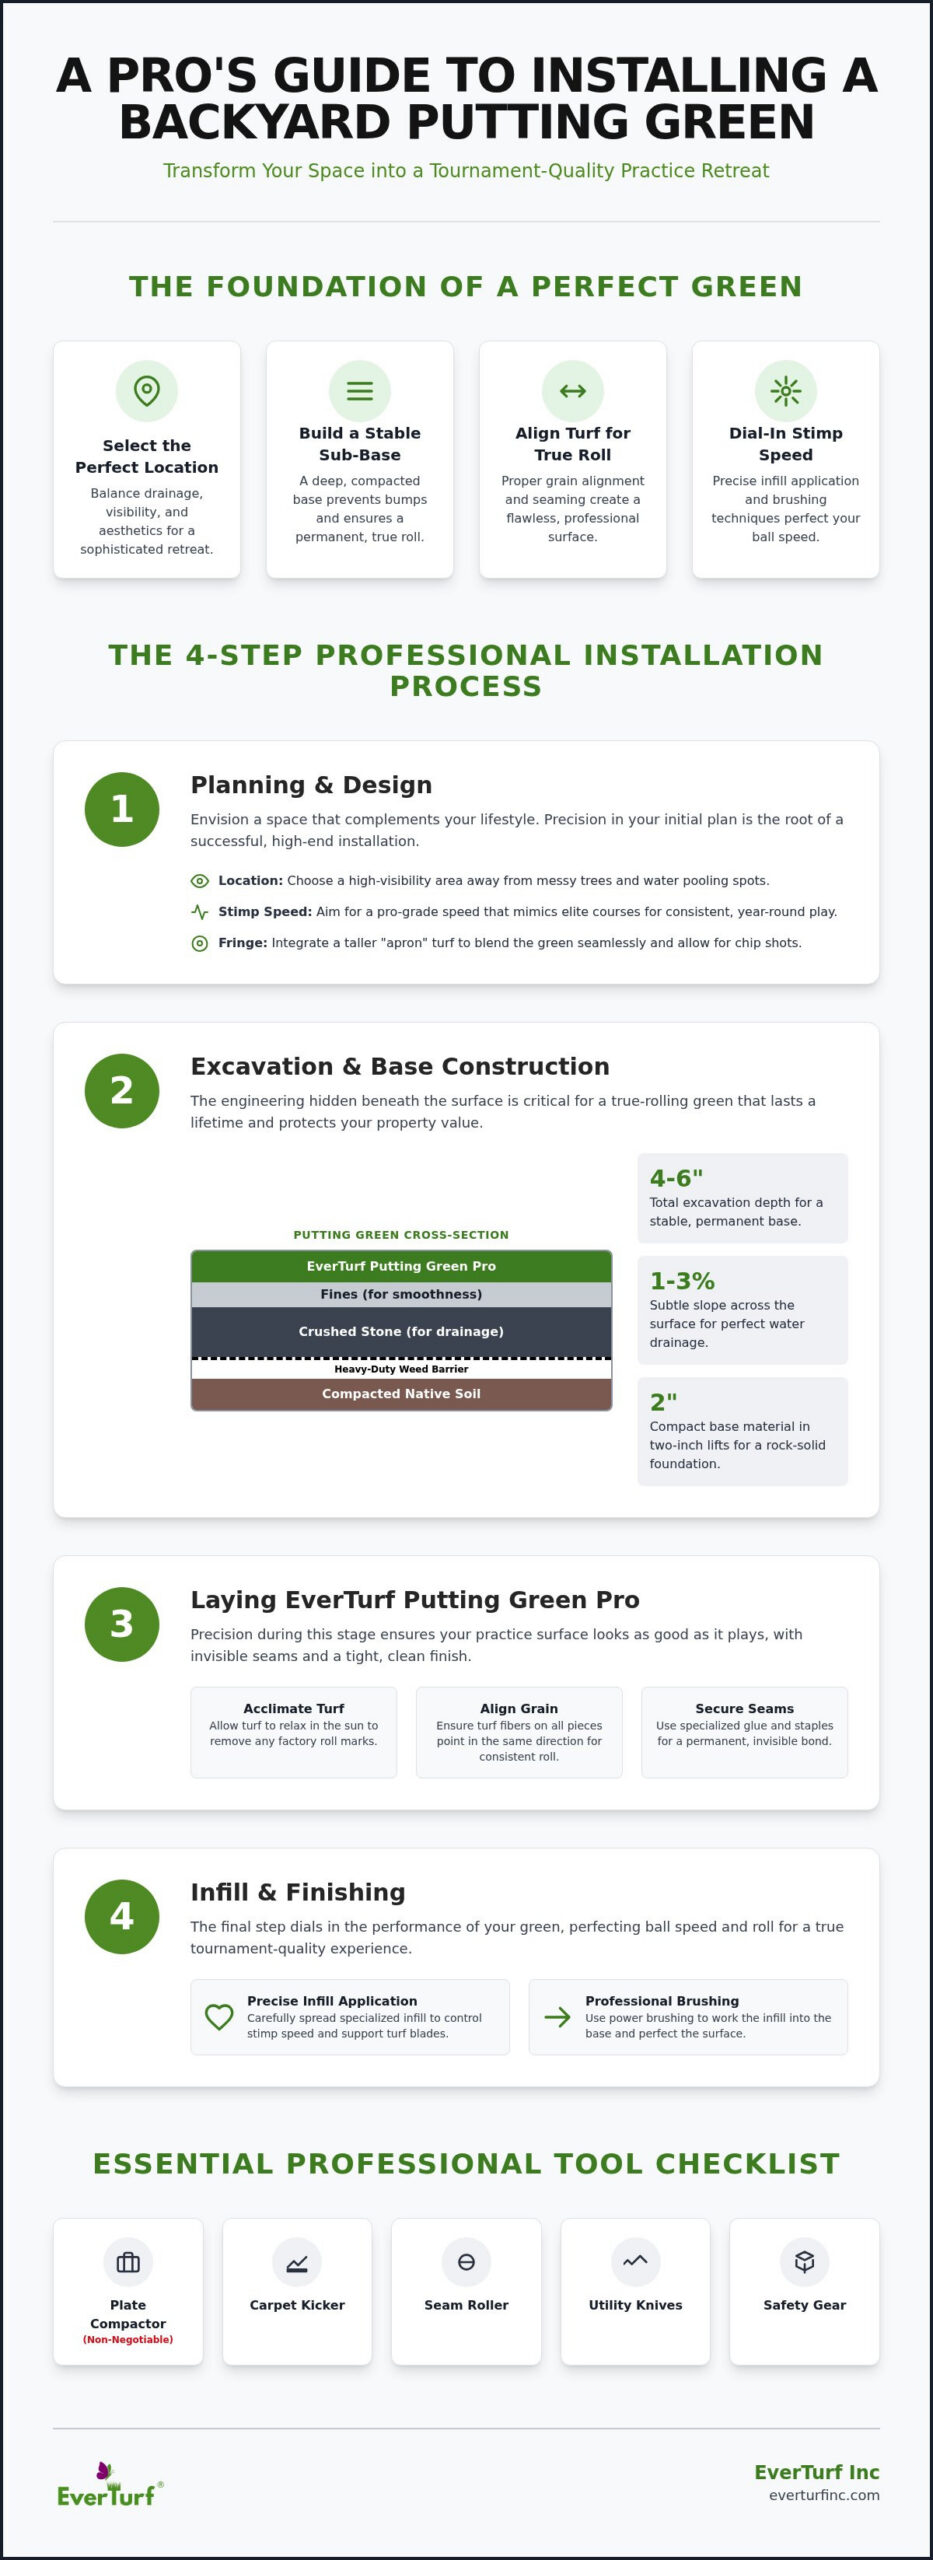
Map out the transition between your putting surface and the surrounding landscape. Integrating a taller fringe turf creates a realistic “apron” for chip shots and helps the green blend seamlessly into your yard. Once your design is finalized, calculate your material needs. You’ll need enough EverTurf Putting Green Pro to cover the surface, plus several inches of crushed stone and fines for the base to ensure a permanent, stable foundation.
The Essential Professional Tool Checklist
A plate compactor is non-negotiable if you want a true roll. Without it, your base will settle unevenly, creating the bumps and dips that ruin a practice session. You’ll also need specialized turf tools like carpet kickers to stretch the material tight and seam rollers to ensure a flat, invisible bond between sections. Precision is everything, so invest in high-quality utility knives and plenty of sharp blades for intricate cutting around cups and fringe curves. Safety gear, including knee pads and gloves, will keep the process comfortable as you transform your space.
Understanding Drainage and Pitch Requirements
Proper drainage is the silent hero of a lasting green. Aim for a 1-3% slope across the entire surface. This subtle pitch is enough to ensure water evacuation during heavy rain without negatively affecting the playability of your breaks. During excavation, identify “soft spots” in the natural soil, like areas with high clay content or old tree roots. These must be excavated deeper and backfilled with stable aggregate. In regions with high rainfall, consider integrating a perforated pipe system beneath the stone base to move water away from the green and toward a designated drainage area.
The Foundation of Precision: Excavation and Base Construction
A true-rolling surface is a masterpiece of engineering hidden just below the surface. To achieve the tranquility of a perfect, year-round practice space, you must first master the art of sub-base construction. When you’re determining how to install a backyard putting green, the excavation phase is your most critical investment of labor. You’ll need to remove all organic matter, including grass, roots, and loose soil, to a depth of 4 to 6 inches. This depth provides enough volume for a stable aggregate base that won’t shift or settle over time, protecting your property’s value and your game’s consistency.
Once the area is cleared, install a heavy-duty weed barrier. This layer acts as a permanent shield, preventing sub-surface growth from pushing through your aggregate and creating unsightly bumps. For the base itself, ignore generic advice that suggests a simple layer of gravel. Instead, build your foundation using a combination of crushed stone for drainage and finer aggregates for smoothness. Layer these materials in two-inch increments, using a plate compactor between each lift. A professional secret is to use a water-misting technique during compaction. The moisture lubricates the stone particles, allowing them to lock together into a rock-hard foundation that feels as solid as a professional tee box.
This level of sub-base precision is identical to the standards required for professional driveway installations. Specialists like globallandscapesanddriveways.co.uk apply these same rigorous engineering principles to ensure that resin and block paving surfaces remain stable and well-drained for decades, providing a perfect example of the technical care needed for any high-end groundworks project.
Sculpting the Break: Creating Realistic Topography
This is where your green gains its personality. Use your base fines to manually shape undulations that challenge your game. A subtle ridge or a gentle slope can turn a simple putt into a sophisticated test of skill. Use a straight edge or a laser level to ensure that the immediate area around each cup remains flat. This prevents “impossible” putts where the ball won’t stay near the hole. Before moving to the next step, validate the flow of the green by rolling a ball across the compacted base to see how it reacts to your custom contours. Mastering this stage is essential when learning how to install a backyard putting green that truly mimics the course.
Setting the Cups for Professional Permanence
Install your cups with the same attention to detail you’d give a structural feature. Position them at least three feet away from the edge of the green to allow for realistic approach shots and fringe play. To ensure they never tilt or sink, secure each cup with a small amount of concrete or specialized base collars. The rim of the cup should sit exactly 1/8 to 1/4 inch below the final height of your base, allowing your EverTurf Putting Green Pro to sit flush for a seamless finish. If you’re looking for the right components to finish this stage, the EverTurf installation accessories provide the professional stability your project requires.
Installing the Surface: Laying EverTurf Putting Green Pro
You have built a rock-solid foundation. Now comes the moment your vision takes physical form. Laying the turf is where your technical preparation meets aesthetic artistry. To begin, roll out your EverTurf Putting Green Pro across the compacted base. This high-performance material needs time to breathe. Let the turf acclimate to the local temperature for at least 24 hours before you make a single cut. This step is a non-negotiable part of how to install a backyard putting green correctly. It allows the backing to relax and ensures the fibers won’t buckle or shift once they are secured.
While the turf rests, pay close attention to the grain. Every synthetic surface has a natural “lean.” For the most sophisticated look and a true-rolling surface, position the turf so the grain faces your primary viewing area, such as your back patio or home office window. This orientation minimizes glare and highlights the deep, emerald tones of the fibers. Once aligned, trim the turf to your custom shape using a sharp utility knife. Leave a slight overlap of roughly two inches where the green will meet your fringe. You will eventually secure these edges using EverTurf Staples and Glue to create a permanent, weather-resistant bond that keeps the surface taut for years.
Mastering the Seamless Join
Visible seams are the hallmark of a DIY project, but you can achieve professional invisibility with the “S-cut” technique. Instead of joining two straight edges, use a gentle, wavy cut to interlock the sections. This breaks up the visual line and allows the fibers to blend naturally. Apply professional-grade turf glue to your seam tape and press the edges together with precision. Use a heavy seam roller to eliminate air pockets and integrate the fibers. This process ensures your practice surface remains a unified, tranquil space without the distraction of unsightly gaps.
Integrating the Fringe and Landscape
A pro-grade green needs a lush, beautiful frame. Transitioning from the short pile of the green to a taller EverTurf fringe provides a realistic aesthetic and a functional area for chipping practice. When blending your green into existing backyard turf designs, ensure the sub-base for the fringe is just as stable as the green itself. Secure the entire perimeter with staples every six inches. This prevents the edges from lifting over time, protecting your investment and ensuring your backyard remains a safe, stress-free environment for family and friends.
Dialing in the Performance: Infill and Finishing
The visual transformation of your property is nearly complete, but the true test of a pro-grade surface lies in its performance. While the turf provides the aesthetic foundation, the infill provides the soul of the game. Mastering how to install a backyard putting green requires a deep understanding of how these small granules interact with the synthetic fibers. To begin this final stage, apply EverTurf Infill evenly across the entire surface using a drop spreader. This ensures a consistent depth that a manual application simply cannot match, providing the uniform density needed for a reliable roll.
Once the material is spread, work it deep into the fibers using a power brush or a stiff push broom. This process is about more than just hiding the sand. The infill acts as a vital ballast that keeps the green perfectly flat against the sub-base you sculpted earlier. It also provides essential support for the turf blades, keeping them upright and protecting them from the wear of daily practice. Without this hidden architecture, your green would eventually shift, buckle, or lose its realistic texture. If you want a surface that remains pristine for years, you must treat the infill phase with the same reverence as the excavation.
The Science of Stimp: Tuning Your Green Speed
Professional golfers often talk about the “stimp” of a green, referring to the speed and distance a ball travels. You can actually tune this speed to match your favorite local course. Generally, adding more infill increases ball speed by reducing the resistance of the grass fibers. This is why your turf infill choice is so critical. It dictates how the ball checks on a chip shot and how it tracks on a long putt. For professional accuracy, use a stimp meter to measure the results after each application. This data-driven approach ensures your backyard feature isn’t just a beautiful addition, but a high-performance athletic tool.
Final Grooming and Settling
After the initial application, perform a final rolling of the green. This settles the granules and smooths out any micro-unevenness in the surface. It is also wise to observe the green after the first heavy rain. Nature has a way of revealing “dead” spots or minor settling that may require a small touch-up of infill. Finally, remove any excess granules from the surface to prevent them from tracking into your home. This attention to detail is what separates a standard yard from a sophisticated outdoor sanctuary. Ready to perfect your practice surface? Elevate your game by selecting the right EverTurf Infill for your custom green.
Long-Term Mastery: Maintenance and Next Steps
After following the meticulous steps of how to install a backyard putting green, you’ve achieved a surface that rivals the finest private clubs. True mastery, however, lies in the long-term stewardship of your new sanctuary. While synthetic turf liberates you from the endless cycle of mowing and fertilizing, a small amount of intentional care ensures your green remains a high-performance feature for years to come. This phase of ownership is about preserving the tranquility and precision you’ve built into your property.
Keep the surface clear of organic debris. Leaves, seeds, and twigs can trap moisture and organic matter, which may eventually lead to moss growth or clogged drainage if left unaddressed. A quick pass with a leaf blower once a week is usually all it takes to maintain the aesthetic appeal of the space. Periodically, you should also brush the green with a stiff push broom. This redistributes the infill and keeps the fibers upright, preventing the matting that can occur in high-traffic areas over time. Consistent brushing ensures the ball continues to roll with the same predictable speed you dialed in during installation.
It is also wise to monitor the base. Even with the best compaction, extreme weather or natural soil shifts can occasionally cause minor settling. Address these micro-depressions immediately with a small amount of extra infill to maintain that true roll you worked so hard to achieve. When you evaluate the cost of maintenance over a ten-year period, you’ll find that these simple tasks are a tiny fraction of the time and money required for natural grass. It’s a rewarding trade-off for a maintenance-free lifestyle.
Seasonal Care for a Year-Round Green
Snow and ice don’t have to end your season. If you choose to clear the green for winter practice, always use a plastic shovel. Metal edges can snag and tear the synthetic fibers, compromising the surface’s integrity. During the height of summer, a quick rinse with a garden hose can lower the surface temperature, keeping the area comfortable for barefoot play. Perform an annual inspection of your seams and edges to ensure the bond remains tight and the perimeter is secure against the elements.
Enhancing the Experience: Lighting and Accessories
Once you’ve mastered the technical side of how to install a backyard putting green, focus on the lifestyle details. Low-voltage LED lighting can transform your green into a stunning nocturnal feature, allowing for peaceful evening practice sessions. Select premium flags and weighted poles that match the sophisticated aesthetic of your EverTurf installation. You might even consider adding a designated tee box using a different turf style to create a complete, multi-hole golf experience that serves as the ultimate backyard retreat.
Elevate Your Property and Your Game
Transforming your outdoor space into a pro-grade golf sanctuary is a journey that rewards precision at every step. By mastering the hidden architecture of a rock-hard foundation and the art of performance tuning with high-quality infill, you create more than just a practice surface. You invest in a sophisticated lifestyle feature that restores your personal time and provides year-round tranquility. Mastering how to install a backyard putting green ensures that every roll is true and every chip checks exactly like it would on a tournament course.
This transition from a high-maintenance lawn to a maintenance-free oasis is an obvious choice for any dedicated homeowner. Our systems offer professional-grade performance and a sophisticated, low-maintenance design that stands the test of time. With reliable national distribution, the materials you need for an everlasting result are always accessible. It’s time to stop dreaming about the perfect green and start playing on one.
Design your dream green with EverTurf Putting Green Pro today.
Take the first step toward a more beautiful, stress-free version of your property. You’ve earned the right to step out your back door and enjoy the lasting satisfaction of a perfect roll, every single time.
Frequently Asked Questions
How long does it take to install a backyard putting green?
A standard installation typically takes between three and five days to complete from start to finish. This timeline includes the initial excavation, the meticulous layering of the aggregate base, and the final precision grooming of the turf. More complex designs with custom undulations or integrated lighting systems may require up to a full week to ensure every detail meets professional standards.
Do I really need a professional base, or can I lay turf on dirt?
You absolutely must install a professional aggregate base because laying turf directly on dirt leads to rapid drainage failure and an uneven surface. A properly compacted foundation of crushed stone and fines ensures the surface remains rock-hard and stable through every season. Mastering this foundation is the most critical part of learning how to install a backyard putting green that delivers a true, predictable roll.
What is the best type of turf for a backyard putting green?
The best choice is a high-density, short-pile synthetic turf specifically engineered for golf performance. EverTurf Putting Green Pro is designed for high-performance athletic use, providing the fiber support needed to maintain consistent stimp speeds. This professional-grade material offers the durability required for daily practice while maintaining a sophisticated, emerald aesthetic that enhances your property’s value.
How much does a DIY putting green installation actually cost?
The total investment for a DIY project depends on the square footage and the complexity of your design. You’ll need to account for the cost of premium turf, weed barriers, and several tons of specialized aggregates for the base. Don’t forget to include the rental of professional machinery, such as a plate compactor, and essential finishing materials like EverTurf Infill and specialized turf glue.
Can I install a putting green over an existing concrete patio?
Yes, you can install a putting green over concrete if the surface is level and has an existing slope for water runoff. You’ll bypass the excavation and base construction phases, instead securing the turf directly to the clean concrete using professional-grade adhesives. It’s an excellent way to transform an underutilized hardscape into a tranquil, functional practice retreat with minimal ground disturbance.
How do I make the seams in my putting green invisible?
Achieving invisible seams requires using a wavy “S-cut” technique rather than joining two straight edges. This method breaks up the visual line and allows the fibers to blend naturally when pressed together. Using high-quality seam tape and EverTurf Staples and Glue ensures a permanent bond that won’t pull apart, while a final power brushing integrates the fibers to hide the join completely.
How often do I need to add more infill to the green?
You should plan to inspect and potentially top off your infill every 12 to 24 months to maintain optimal ball speed. While the initial application provides the necessary weight and fiber support, heavy rain and wind can gradually redistribute the granules over time. Regular maintenance checks ensure your green continues to offer the same high-performance feel it had on the day it was installed.
Will a backyard putting green increase my home value?
A professionally installed putting green is a sophisticated luxury feature that can significantly increase your property’s market appeal. Modern buyers often seek out low-maintenance, lifestyle-enhancing outdoor spaces that offer immediate recreational value. Understanding how to install a backyard putting green with high-quality materials ensures your investment remains a durable, beautiful asset that sets your home apart from traditional properties.