



EverTurf Putting Green Pro Installation Guide: Master the Art of the Perfect Roll
You deserve a surface that drains at a staggering 140 inches per hour and remains pristine through every season. We’ll show you how to master the critical 3 to 4 inch gravel base and the precise application of EverTurf Infill, specifically using 1 to 2 pounds of #90 silica sand per square foot to control ball speed. From securing the perimeter with 60-D nails to ensuring your seams are invisible, this guide provides the logical evidence and technical clarity you need. Get ready to transform your outdoor space into a tranquil, high-performance sanctuary where the only thing you have to focus on is your next birdie.
Key Takeaways
- Master the critical site evaluation process to ensure your landscape provides the perfect drainage and foundation for a tournament-quality green.
- Understand the engineering required for a professional sub-base, focusing on the specific aggregates that dictate the physics of a consistent ball roll.
- Follow this EverTurf Putting Green Pro installation guide to achieve invisible seams and precise grain alignment for a sophisticated, high-performance aesthetic.
- Learn why the layered application of EverTurf Infill is non-negotiable for controlling stimp speeds and protecting the structural integrity of your surface.
- Implement proactive grooming techniques that preserve the beauty of your sanctuary while restoring your personal practice time for years to come.
Preparing for Your EverTurf Putting Green Pro Installation
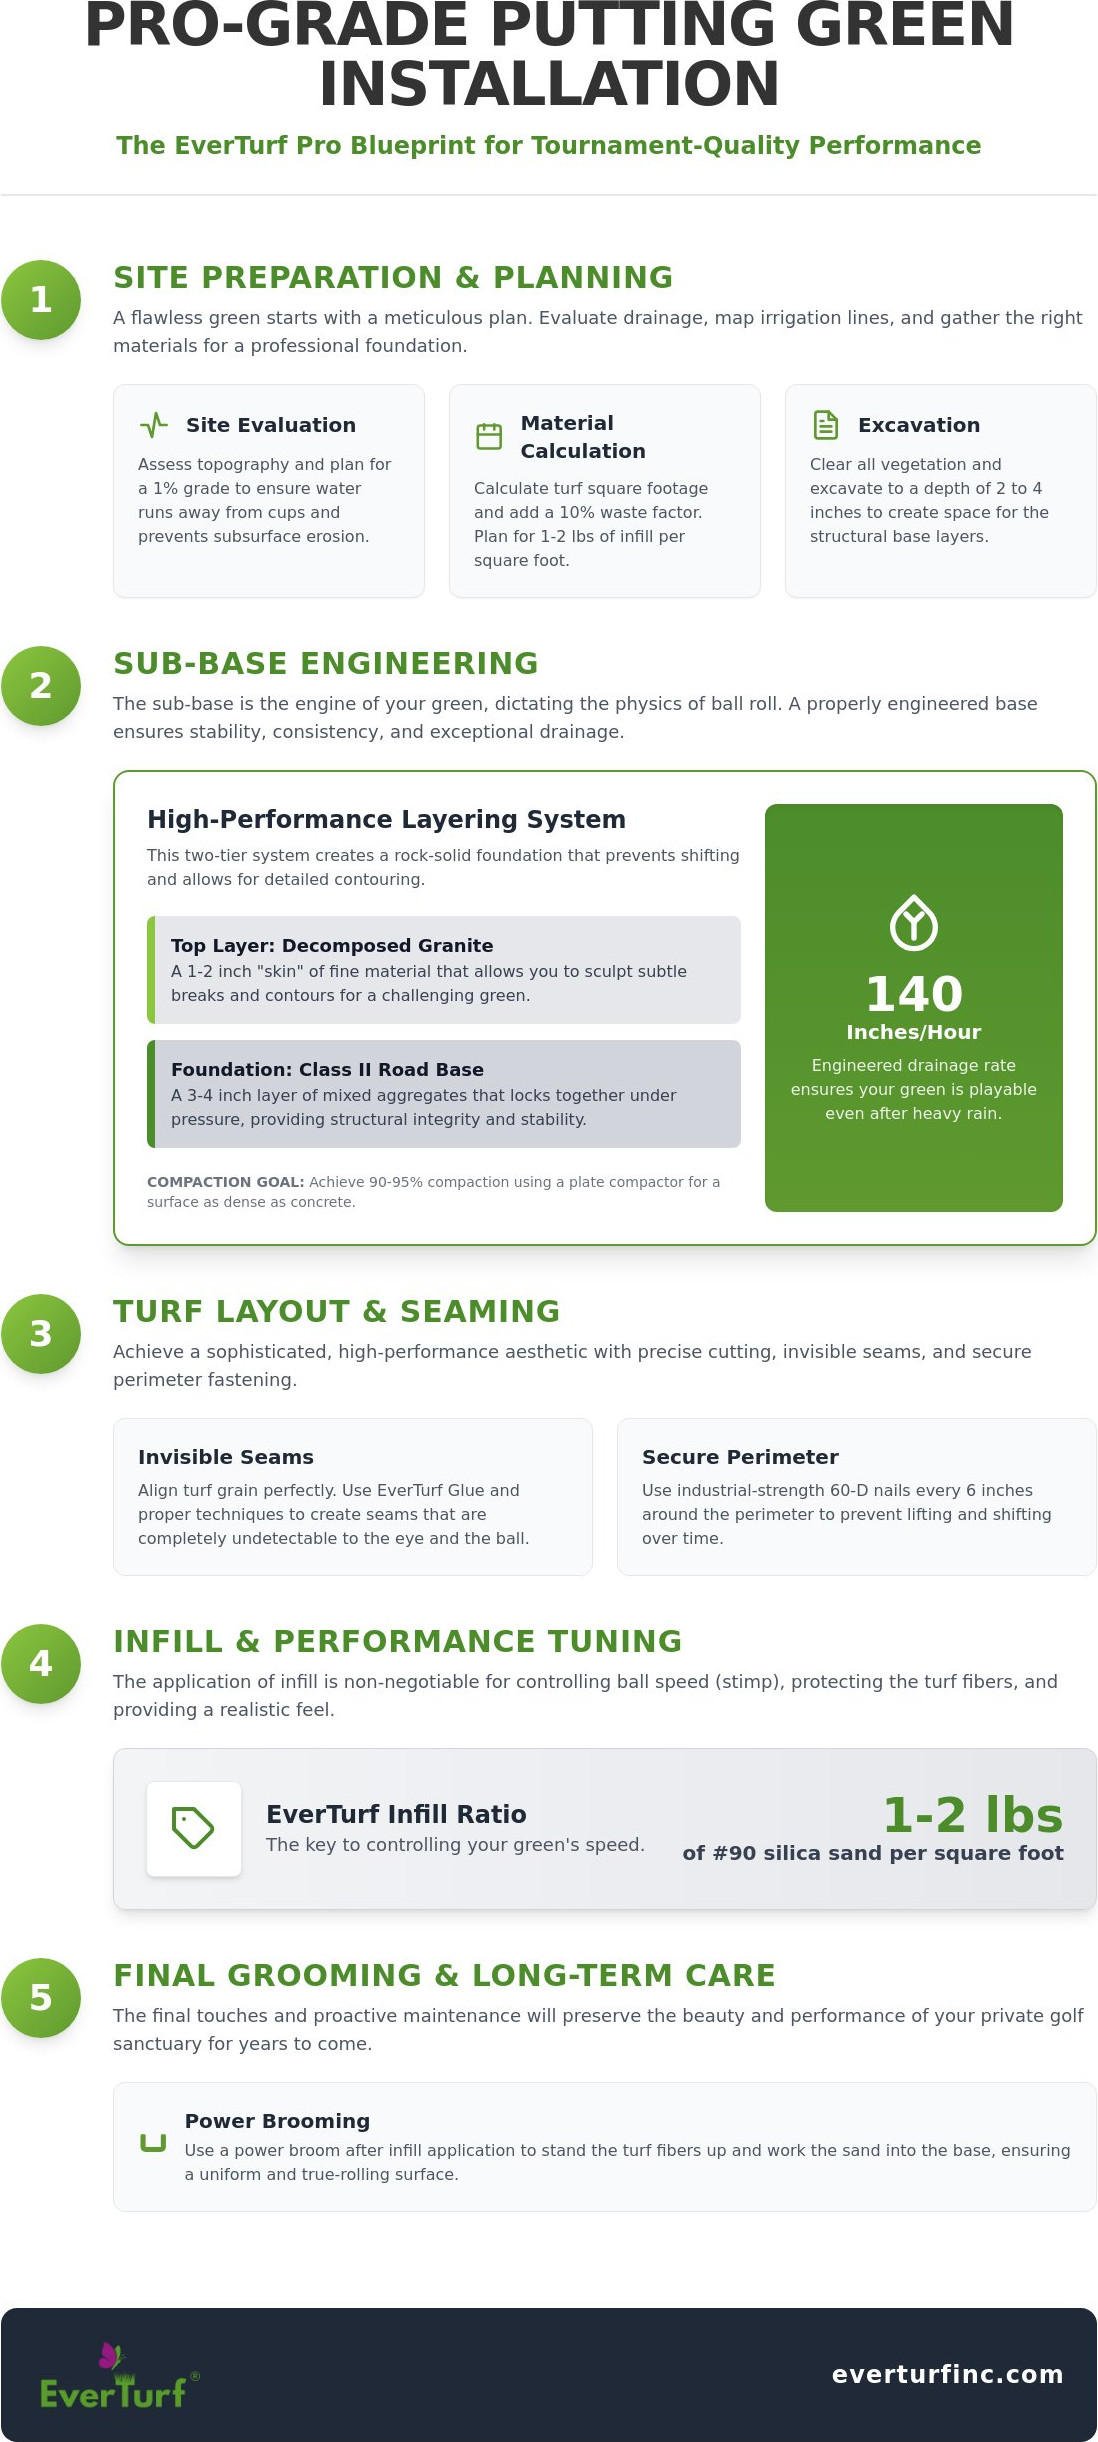
Success on the green begins long before you take your first practice putt. This EverTurf Putting Green Pro installation guide emphasizes that the secret to a tournament-quality roll lies in the meticulous preparation of your site. Start by evaluating your yard’s natural topography. While natural grass struggles in the shade, your synthetic green is immune to sunlight requirements, yet you must still account for drainage. Poorly managed runoff leads to subsurface erosion or moisture buildup. Map out your existing irrigation lines to avoid a costly puncture during the excavation phase. Understanding the history and development of artificial turf reveals that modern high-performance systems rely entirely on the engineering of the space beneath the blades.
A professional result requires a dedicated tool kit. Renting a plate compactor is essential for achieving the density needed for a stable, predictable base. You’ll also need a power broom to stand the fibers up after the infill is applied and a sharp turf cutter for precise shaping. When your delivery arrives, handle the rolls with care. These professional-grade materials are heavy and dense. Store them on a flat surface and never fold the turf. Creases in high-density putting surfaces can be difficult to remove once the backing has set.
The Essential Material Checklist
Precision starts with accurate calculations. Determine your turf square footage and add a 10% waste factor for irregular cuts and shaping. EverTurf Infill is a critical component, typically requiring 1 to 2 pounds per square foot to achieve the desired stimp speed and weight. Don’t settle for “discount” staples from a local hardware store. EverTurf industrial-strength staples are designed to resist the ground heave that often pushes cheaper alternatives out of the soil. You’ll also need EverTurf Glue for secure, permanent seams. Calculate your base rock needs by determining the cubic yardage of your 3 to 4 inch excavation depth to ensure a solid foundation.
Site Remediation and Layout
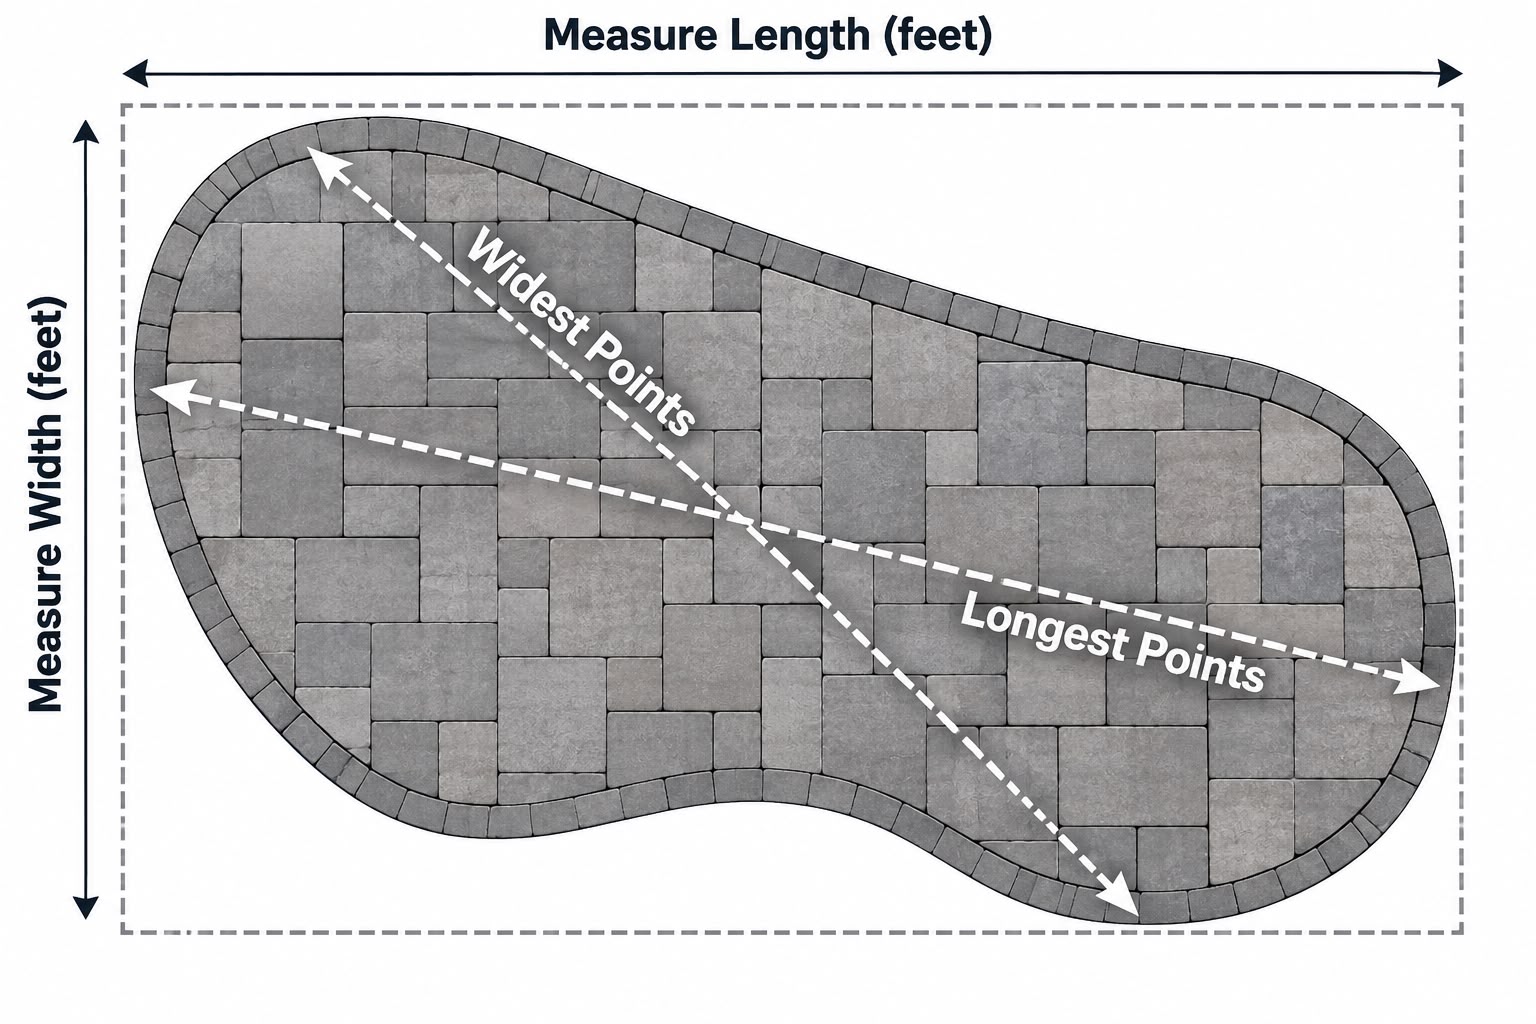
Begin by clearing all existing vegetation and excavating to a depth of 2 to 4 inches. This creates the necessary volume for your structural base layers. Use marking paint to distinguish the “green” from the surrounding “fringe.” This multi-turf aesthetic adds visual depth and mimics the sophisticated look of a private country club. Plan your drainage runoff so water moves away from the cup locations. A slight 1% grade is often enough to keep your sanctuary dry without negatively affecting the subtle breaks of your putts. This careful layout ensures your landscape increases property value while providing a stress-free environment for years to come.
Engineering the Sub-Base: The Foundation of Pro-Level Ball Roll
The sub-base is the engine room of your golf sanctuary. It’s the compacted layer of rock and fines that ensures a smooth, stable surface, dictating exactly how the ball reacts when it leaves your putter face. While the turf provides the aesthetic, the sub-base provides the physics. To achieve a tournament-quality experience, you must move beyond simple dirt leveling. This EverTurf Putting Green Pro installation guide focuses on creating a rock-hard foundation that won’t shift, dip, or settle over time. If you’re ready to select your materials, browse the EverTurf Putting Green collection to find the perfect match for your home project.
Selecting the right aggregate is your first critical decision. Professionals typically utilize a two-tier system. Start with a 3 to 4 inch layer of Class II road base for structural integrity. This material contains a mix of larger stones and fine particles that lock together under pressure. Follow this with a 1 to 2 inch “skin” of decomposed granite. This finer material allows you to sculpt the subtle details of the green. This “Lift and Drain” philosophy creates a high-performance hydraulic environment. When engineered correctly, your system can handle a drainage rate of 140 inches per hour, ensuring your practice isn’t interrupted by the heaviest rains.
Achieving maximum density requires the “dampen and dance” technique. Lightly mist your base material with water before running the plate compactor. The moisture acts as a lubricant, allowing the rock particles to slide into a tighter configuration. As you work, keep a sharp eye out for “soft spots” or areas that feel spongy. Dig these out and replace them with fresh aggregate immediately. Finish the process with a final layer of fines, smoothed out with a landscaping rake to remove every pebble or ridge.
Designing Contours and Undulations
Real-world golf isn’t played on a flat carpet. Building subtle breaks into your green creates a realistic practice environment that actually improves your game. Use your base material to create gentle tiers or “crowns” without sacrificing drainage flow. Always verify the “Pro” roll with a long level or a straight-edge board before the turf goes down. If the base isn’t perfect, the turf won’t be either. Taking the time to sculpt these undulations now ensures a sophisticated, challenging surface that provides long-term satisfaction.
Layout, Cutting, and Seaming with EverTurf Precision
Once your sub-base is perfectly sculpted and compacted, it’s time to bring your vision to life. Begin by unrolling your EverTurf Putting Green Pro and letting it “relax” in the sun for at least 2 to 4 hours. This step is a vital component of any professional EverTurf Putting Green Pro installation guide; the heat allows the heavy backing to expand and lose the tension from being tightly rolled at the factory. Skipping this stage often leads to unsightly wrinkles or expansion gaps once the project is finished. While the turf rests, double-check your grain direction. For the most consistent, tournament-quality ball roll, ensure the grain is facing the same direction across all sections of your green. Most professionals prefer the grain facing the primary putting area to reduce glare and provide a true-to-life speed.
Precision cutting is what separates an amateur DIY project from a sophisticated outdoor sanctuary. Use a sharp carpet knife or a specialized turf cutter to trim the perimeter. Always cut from the back of the turf to avoid damaging the fibers. When you’re ready to secure the edges, use EverTurf Staples every 6 inches along the perimeter. This high-strength security ensures your green remains stable through temperature fluctuations and heavy foot traffic, providing the long-term satisfaction of a permanent landscape upgrade.
The Art of the Invisible Seam
Achieving a seamless finish is essential for both aesthetics and performance. Professionals use the “S-cut” technique rather than a straight line. By cutting a subtle wave through the overlapping sections, you break up the visual seam, making it nearly impossible for the human eye to detect. Apply EverTurf Glue to the seam tape, ensuring full coverage without over-applying. If the glue bleeds through to the fibers, it can create hard spots that deflect the ball. Once the two sides are joined, place heavy weights along the seam for 24 hours to ensure a permanent, industrial-strength bond.
Cup Placement and Finishing
Setting your cups is a delicate process that requires a steady hand. Position the cups so the lip sits exactly 1/8th inch below the turf surface. This depth allows the ball to drop cleanly without catching on the plastic edge. When cutting the turf over the cup, use a “star” pattern, making several small incisions from the center outward. This allows you to tuck the turf flaps snugly into the cup for a professional, finished look. Finally, secure the transition where your putting surface meets the fringe turf. A clean, tight edge here prevents organic debris from migrating onto your green, preserving your personal practice time for years to come.
Infill Application and Performance Tuning
Infill is the final, essential step in this EverTurf Putting Green Pro installation guide. It acts as both the structural ballast and the primary performance modifier for your surface. Without it, the synthetic fibers lack the support needed to resist the weight of a golf ball, leading to a “matted” look that ruins the aesthetic. EverTurf Infill is non-negotiable because it provides the lateral resistance required for a predictable, tournament-quality roll. Apply the material in multiple thin layers using a drop spreader. Don’t dump large amounts at once, as this will trap the blades beneath the sand and create a lumpy, uneven surface that disrupts your practice consistency.
Between every layer, use a power broom to work the granules deep into the base of the fibers. This process ensures the sand settles at the bottom, providing a firm foundation while leaving the tips of the blades exposed for a realistic feel. You can actually tune your stimp speed during this phase. Adding more infill creates a faster, firmer green by reducing the depth of the “pile” and lowering the friction against the ball. To achieve the perfect roll for your specific game, order EverTurf Infill today and start fine-tuning your home course for long-term satisfaction.
Calculating Infill Ratios
For the Putting Green Pro, aim for a standard application of 1 to 2 pounds of #90 silica sand per square foot. The choice of aggregate is critical for the physics of the game. Professionals prefer rounded silica sand over sub-angular infill because it allows for superior drainage and doesn’t compact into an impermeable brick. This ensures your green maintains its 140-inch-per-hour drainage rate while providing a smooth, level surface. Use a push broom or a leveling rake to ensure the infill is perfectly distributed across the entire green, eliminating any micro-dips that could deflect a perfect putt.
Brushing and Grooming for Speed
Mastery of the “cross-brushing” technique is the hallmark of a professional installer. Brush the turf in multiple directions to stand the fibers upright, which helps the infill settle evenly around the base of each blade. Once the application is complete, test the green using a stimpmeter. This tool provides the logical evidence you need to confirm your green matches the speeds of your local country club. Your green will have a final “settling” period of about two weeks. As the infill finds its permanent home and the fibers adjust to the local climate, you’ll notice the roll becomes even smoother, restoring your personal practice time with a truly elite surface.
Final Grooming and Long-Term Care for Your EverTurf Sanctuary
The completion of your home course marks the beginning of a sophisticated, stress-free lifestyle. Unlike natural sod, which demands constant fertilization and mowing, your synthetic sanctuary requires only minimal intervention to maintain its tournament-quality roll. This final stage of the EverTurf Putting Green Pro installation guide ensures your investment remains a high-performance asset for decades. A key maintenance habit is the “hydraulic flush.” Periodically rinsing your green with water clears away fine dust and pollen that can accumulate within the fibers. This simple practice preserves the high-performance drainage rate of 140 inches per hour that we established during the sub-base construction, preventing the stagnant moisture that can lead to unpleasant odors.
Remove organic matter like leaves, twigs, and grass clippings promptly. If left to decompose, these materials create a layer of soil that invites weed growth and clogs the drainage pores of the backing. While your green is incredibly durable, protect the engineered sub-base from heavy point loads. Avoid placing heavy patio furniture or sharp-legged equipment directly on the putting surface. These can cause permanent indentations in the 90 to 95% compacted base, creating subtle dips that will eventually affect your ball’s trajectory and the overall aesthetic of your landscape.
Seasonal Maintenance Routine
Maintain the beauty of your green with a leaf blower rather than a traditional metal rake. A blower effectively removes debris without disturbing the carefully tuned EverTurf Infill levels. Once a year, perform a “refresh” by cross-brushing the fibers to combat any minor flattening from heavy foot traffic. If you notice any significant settling or ripples after a particularly harsh season, it’s time to add a light top-dressing of infill to restore the original stimp speed. For more complex issues, reaching out to a Pro Partner ensures your green receives a professional-grade restoration that keeps it looking brand new through every season.
Enjoying Your Everlasting Result
The true value of this project isn’t just the increase in property value; it’s the restoration of your personal time. You’ve traded hours of exhausting lawn maintenance for hours of focused practice. Imagine hosting your own backyard tournament, where the surface rolls as true as a private country club and the environment remains pristine year-round. This is the tranquility of a perfect outdoor space that adapts to your life, not the other way around. Ready to start? Request your free EverTurf Putting Green Pro quote today!
Step Into Your Private Championship Green
Transforming your backyard into a high-performance sanctuary is a journey of precision and vision. By mastering the engineering of a compacted sub-base and the art of the invisible seam, you’ve laid the groundwork for a lifetime of better golf. This EverTurf Putting Green Pro installation guide provides the technical roadmap to move beyond average DIY projects and achieve the sophisticated, tournament-quality roll you deserve. You’re no longer just managing a landscape; you’re cultivating a lifestyle where personal practice time is restored and maintenance frustrations are a thing of the past.
Our professional-grade solutions are built for serious golfers who value durability and long-term satisfaction. With nationwide distribution and support, we’re here to ensure your result is nothing short of everlasting. It’s time to stop dreaming about the perfect roll and start experiencing it every day. To see the quality of our materials firsthand, Order Your EverTurf Putting Green Pro Sample Kit and take the first step toward your new outdoor reality. Your best game is waiting just outside your door.
Frequently Asked Questions
Can I install EverTurf Putting Green Pro over existing grass?
No, you cannot install directly over existing grass because the organic matter will decompose and cause the surface to sink and become uneven. A professional installation requires excavating 2 to 4 inches of soil to make room for a stable, compacted aggregate base. This ensures your green remains perfectly level and drains efficiently, preserving the sophisticated look and structural integrity of your property.
How much EverTurf Infill do I need for a 500 sq. ft. green?
You will need between 500 and 1,000 pounds of EverTurf Infill for a 500 square foot area. This calculation is based on the industry standard of 1 to 2 pounds of #90 silica sand per square foot. Using the correct amount of infill is a vital step in this EverTurf Putting Green Pro installation guide, as it provides the necessary weight to keep the turf flat and the fibers supported for a consistent roll.
What is the best sub-base for a professional-grade putting green?
The most effective sub-base is a combination of 3 to 4 inches of Class II road base followed by a 1 to 2 inch top layer of decomposed granite. This dual-layer system provides the structural integrity needed to prevent shifting while allowing you to sculpt subtle breaks. Achieving 90 to 95 percent compaction on this base creates the rock-hard foundation required for a tournament-quality experience at home.
Do I need to use EverTurf Glue for the seams, or are staples enough?
You must use EverTurf Glue and seam tape for all internal joints to ensure they remain invisible and permanent. While staples are excellent for securing the perimeter every 6 inches, they aren’t enough to prevent seams from gapping or shifting over time. Using industrial-strength adhesive creates a unified surface that can withstand temperature fluctuations without compromising the physics of your game.
How do I ensure the ball rolls straight on my new green?
Ensuring a straight roll depends on perfect grain alignment and a meticulously smooth sub-base. When laying out your turf, make sure the fibers of every section face the same direction to avoid inconsistent friction. Additionally, use a long level to verify your base is free of micro-ridges or pebbles before the turf is secured. These steps guarantee a predictable ball path that mimics the best private courses.
Can EverTurf Putting Green Pro handle pet waste and heavy rain?
Yes, the system is engineered to handle both pet waste and extreme weather with ease. The Putting Green Pro features a superior drainage rate of 140 inches per hour, allowing water and liquid waste to flush through the backing immediately. For pet owners, a regular hydraulic flush with a garden hose will keep the surface clean and prevent any buildup of organic debris that could affect performance.
How do I adjust the stimp speed of my green after installation?
You can increase the stimp speed by adding more EverTurf Infill and cross-brushing the surface. Adding sand fills the space between the fibers, which lowers the pile height and reduces the friction against the ball. If you prefer a slower, more receptive green for chip shots, use slightly less infill. This flexibility allows you to tune the performance to match your specific playing preferences and practice goals.
What should I do if I see a seam starting to lift?
If a seam begins to lift, you should clean the area of any debris and re-apply a fresh layer of EverTurf Glue. Once the adhesive is applied to the seam tape, press the turf back into place and use heavy weights to hold it down for at least 24 hours. Addressing minor lifts early prevents moisture from entering the sub-base and ensures the long-term satisfaction of your outdoor sanctuary.