

DIY Artificial Turf Installation – What You Need to Know Before You Start
Installing artificial turf yourself can be a rewarding project — if you’re prepared. Before you grab your tools, here’s what you need to know to ensure a successful DIY turf installation.
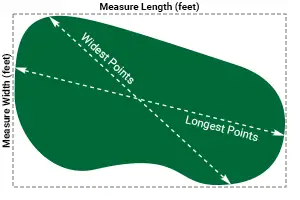
1. Proper Planning is Everything
Measure your space accurately and order slightly more turf than needed to account for trimming and adjustments. Plan your drainage slope in advance.
2. Invest in a Strong Base
Your turf is only as good as the base beneath it. Excavating 3–4 inches and installing compacted crushed stone is essential for stability and drainage.
3. Use a Weed Barrier
Skipping this step can lead to unwanted growth beneath your turf. A quality weed membrane protects your investment.
4. Seam Carefully
If your project requires multiple turf rolls, align the grain direction and seam them carefully to avoid visible lines.
5. Secure Edges Properly
Use landscaping nails or spikes around the perimeter and along seams to prevent shifting over time.
6. Don’t Skip the Infill
Infill helps blades stand upright, improves durability, and enhances the natural appearance of your lawn.
7. Know When to Call a Pro
DIY works well for small, simple areas. For large spaces, slopes, or complex designs, professional installation can save time and prevent costly mistakes.
Final Thoughts
DIY artificial turf installation can deliver great results when done correctly. With proper preparation, patience, and attention to detail, you can create a beautiful, low-maintenance lawn that lasts for years.