

The Complete Guide to Artificial Turf Installation
Artificial turf has become one of the most popular landscaping solutions for homeowners and businesses looking for a beautiful, low-maintenance alternative to natural grass. Whether you’re upgrading your backyard, commercial space, or rooftop, proper installation is the key to long-lasting performance and a natural look.
In this guide, we’ll walk you through everything you need to know about turf installation.
Why Proper Turf Installation Matters
Artificial grass is a long-term investment. When installed correctly, it can:
-
Improve drainage
-
Prevent wrinkles and shifting
-
Reduce weed growth
-
Extend the lifespan of your turf
-
Maintain a smooth, natural appearance
Poor installation, on the other hand, can lead to uneven surfaces, water pooling, and premature wear.
Step-by-Step Turf Installation Process
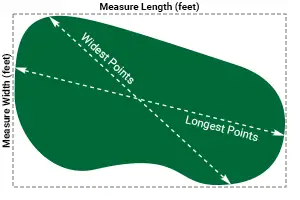
1. Site Preparation
The first and most important step is preparing the area.
-
Remove existing grass, weeds, and debris
-
Excavate soil (typically 3–4 inches deep)
-
Ensure proper grading for drainage
This creates a clean and stable foundation.
2. Base Installation
A strong base ensures durability and proper drainage.
-
Add a layer of crushed stone or decomposed granite
-
Spread evenly and compact thoroughly
-
Check for level and slope
A properly compacted base prevents sinking and movement over time.
3. Weed Barrier Installation
Installing a high-quality weed barrier fabric helps prevent unwanted growth beneath the turf while still allowing water to drain naturally.
4. Laying the Turf
Now comes the transformation stage.
-
Roll out the artificial turf
-
Allow it to acclimate and flatten
-
Trim edges for a precise fit
-
Seam multiple sections carefully
Attention to detail during this step ensures invisible seams and a seamless finish.
5. Securing and Infill Application
-
Secure edges with landscaping nails or spikes
-
Apply appropriate infill material
-
Brush fibers upright for a natural look
Infill adds stability, supports blade structure, and enhances durability.
DIY vs Professional Installation
DIY Installation can be a great option for handy homeowners with the right tools and preparation.
Professional Installation ensures expert grading, precise seaming, and long-term performance — especially for larger or more complex areas.
If you’re unsure, consulting with a turf specialist can help you determine the best approach for your project.
Maintenance After Installation
Artificial turf requires minimal maintenance compared to natural grass. Simply:
-
Rinse occasionally to remove dust
-
Brush fibers to maintain appearance
-
Remove debris as needed
No mowing. No watering. No fertilizing.
Final Thoughts
Artificial turf installation is a straightforward process when done correctly. With proper preparation, quality materials, and attention to detail, you can enjoy a lush, green lawn year-round without the constant upkeep.
Thinking about starting your turf project? Connect with a trusted installer or explore professional installation services to ensure your outdoor space is built to last.